
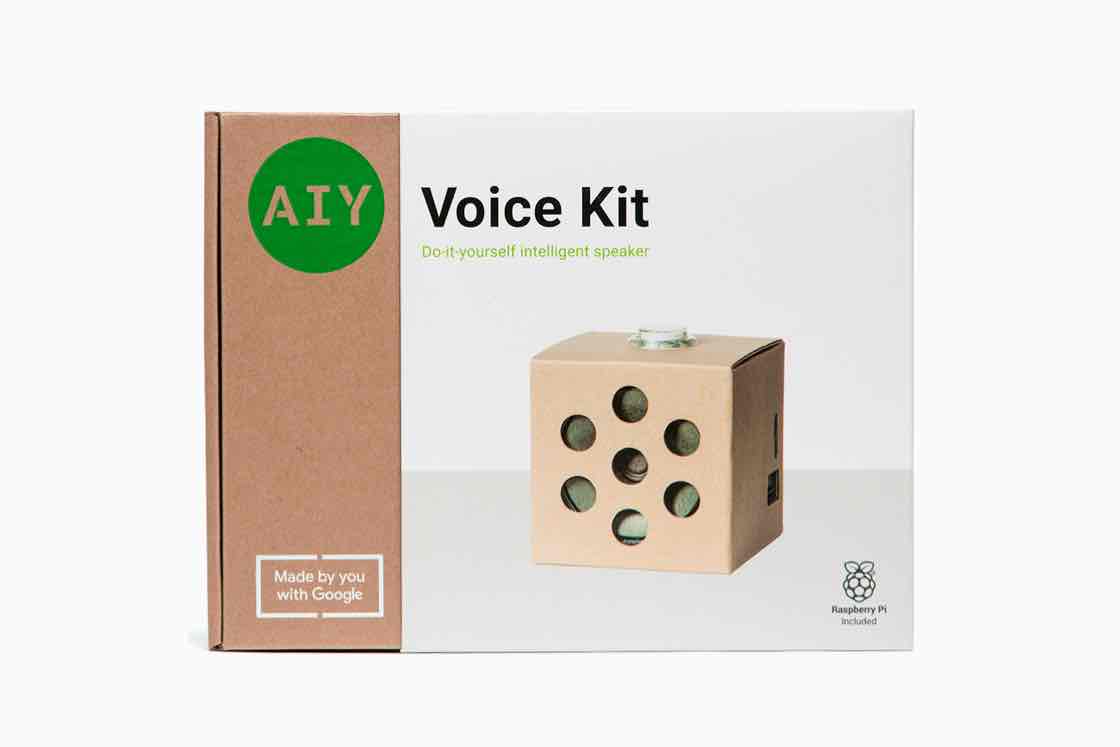
Voice Kit
Do-it-yourself intelligent speaker. Experiment with voice recognition and the Google Assistant.
Introduction
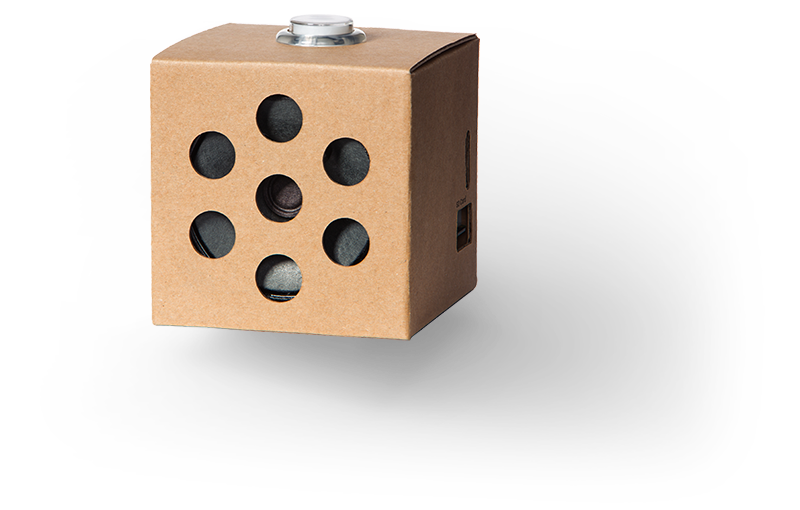
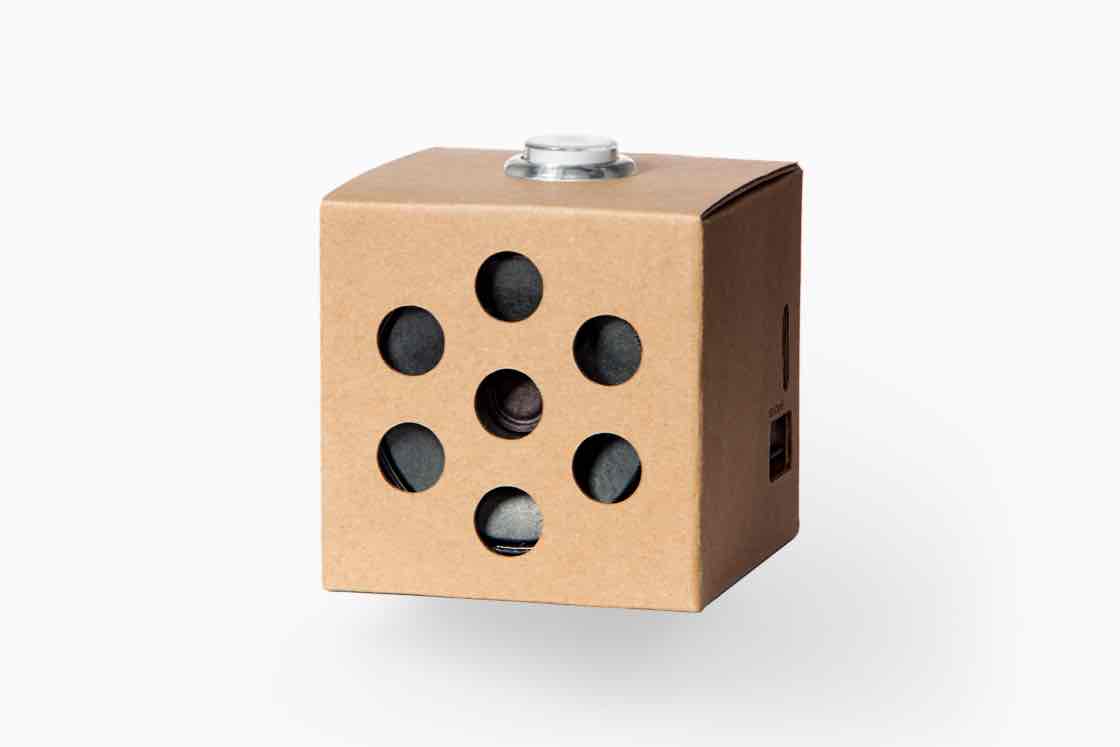
The AIY Voice Kit from Google lets you build your own natural language processor and connect it to the Google Assistant or Cloud Speech-to-Text service, allowing you to ask questions and issue voice commands to your programs. All of this fits in a handy little cardboard cube, powered by a Raspberry Pi.
Everything you need is provided in the kit, including the Raspberry Pi.
Meet your kit
Welcome! Let’s get started
The following instructions show you how to assemble your AIY Voice Kit, connect to it, and run the Google Assistant demo, which turns your kit into a voice assistant that responds to your questions and commands.
Then you can try some other sample code or use the Google Cloud Speech-to-Text service, which converts spoken commands into text you can use to trigger actions in your code.
Time required to build: 1.5 hours
If you have any issues while building the kit, check out our help page or contact us at support-aiyprojects@google.com.
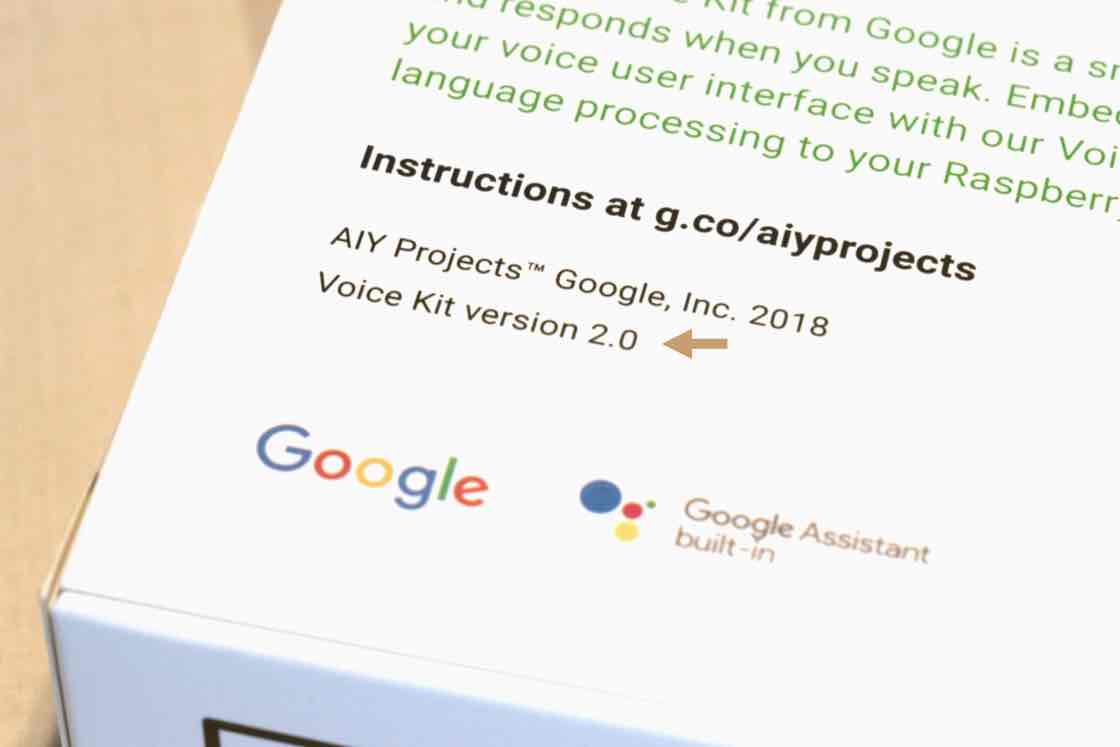
Check your kit version
These instructions are for Voice Kit 2.0. Check your kit version by looking on the back of the white box sleeve in the bottom-left corner.
If it says version 2.0, proceed ahead! If it doesn’t have a version number, follow the assembly instructions for the earlier version.
Gather additional items
You’ll need some additional things, not included with your kit, to build it:
- 2mm flat screwdriver: For tightening the screw terminals
- Micro USB power supply: The best option is to use a USB Power supply that can provide 2.1 Amps of power via micro-USB B connector. The second-best choice is to use a phone charger that also provides 2.1A of power (sometimes called a fast charger). Don't try to power your Raspberry Pi from your computer. It will not be able to provide enough power and it may corrupt the SD card, causing boot failures or other errors.
- Wi-Fi connection
Below are two different options to connect to your kit to Wi-Fi, so that you can communicate with it wirelessly.
Option 1: Use the AIY Projects app
Choose this option if you have access to an Android smartphone and a separate computer.
You’ll need:
- Android smartphone
- Windows, Mac, or Linux computer
Option 2: Use a monitor, mouse, and keyboard
Choose this option if you don’t have access to an Android smartphone.
You’ll need:
- Windows, Mac, or Linux computer
- Mouse
- Keyboard
- Monitor or TV (any size will work) with a HDMI input
- Normal-sized HDMI cable and mini HDMI adapter
- Adapter to attach your mouse and keyboard to the kit. Below are two different options.
Adapter option A: USB On-the-go (OTG) adapter cable to convert the Raspberry Pi USB micro port to a normal-sized USB port. You can then use a keyboard/mouse combo that requires only one USB port.
Adapter option B: Micro USB Hub that provides multiple USB ports to connect to any traditional keyboard and mouse.
Get to know the hardware
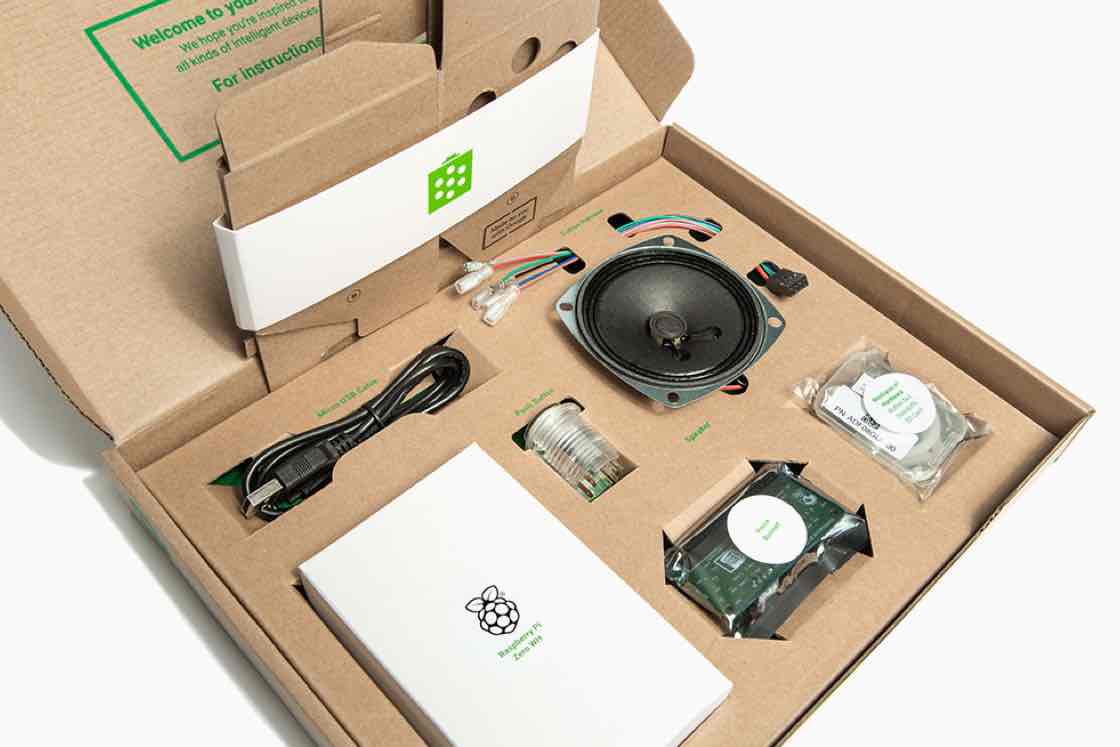
Open your kit and get familiar with what’s inside.
Missing something? Please send an email to support-aiyprojects@google.com and we will help direct you to finding a replacement.
List of materials
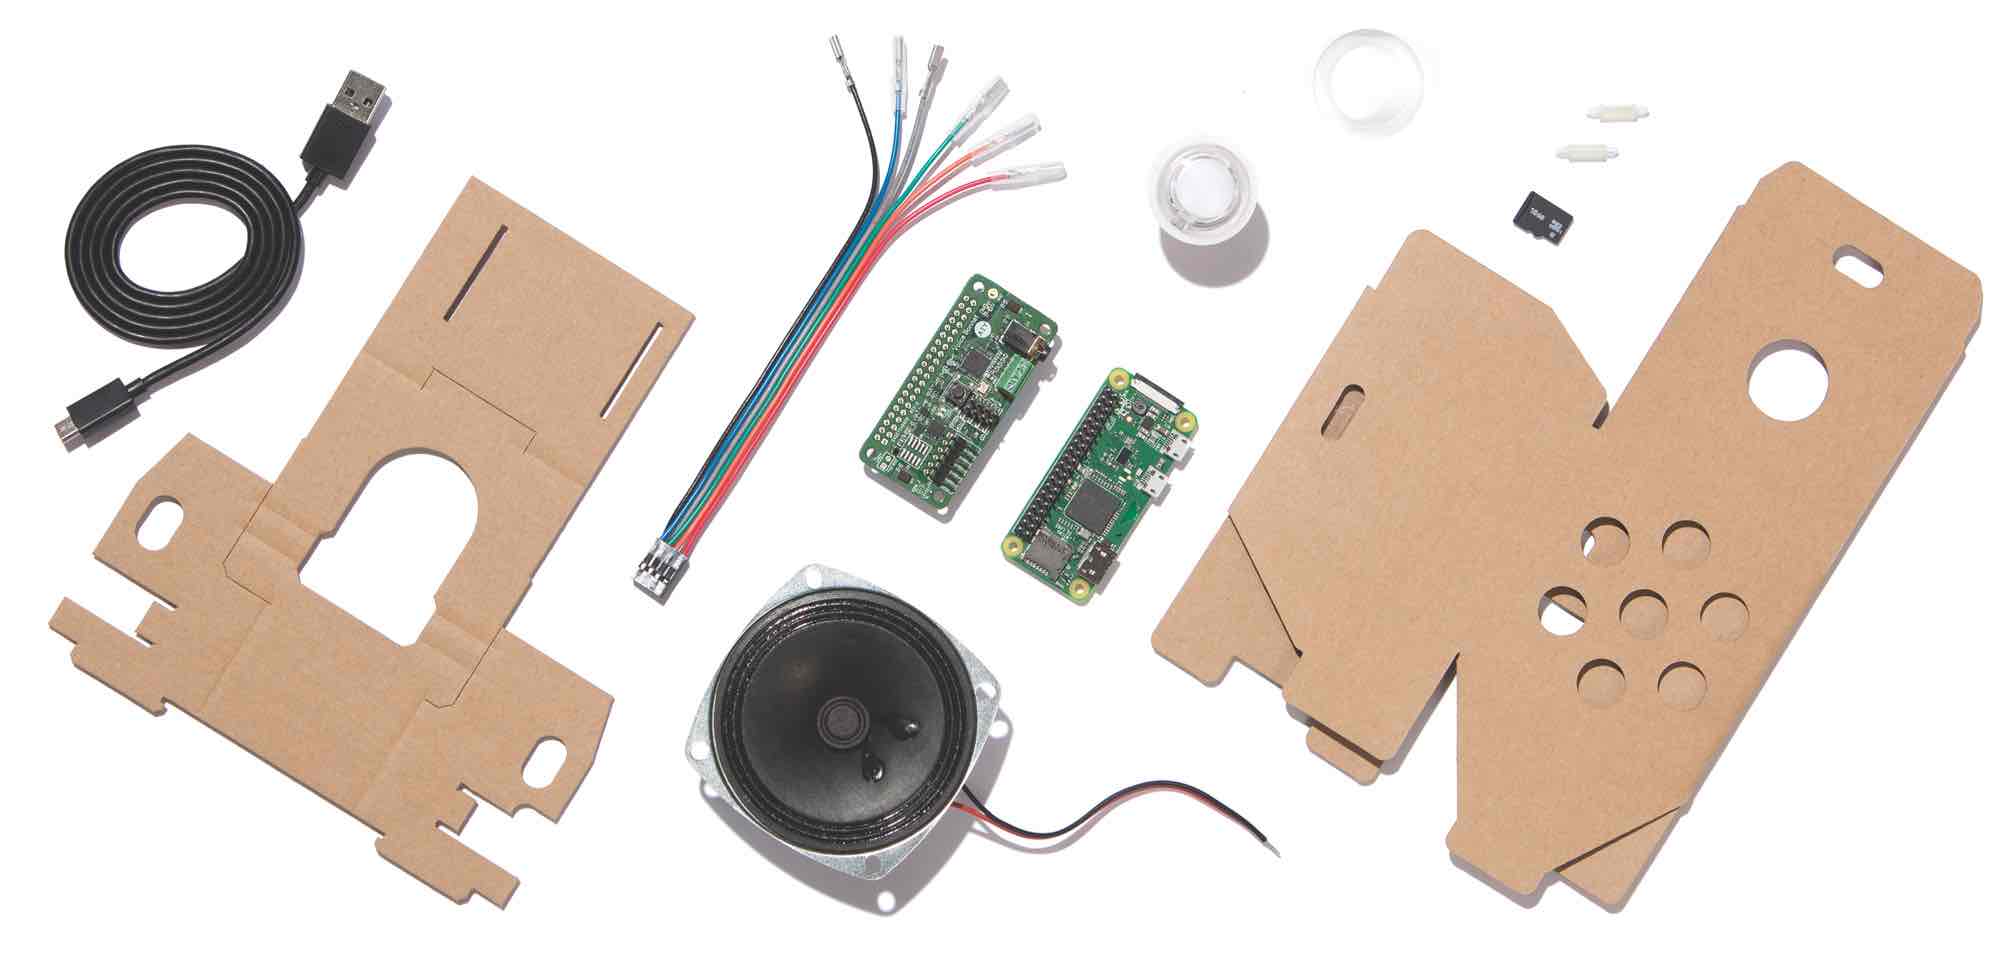
In your kit
- 1Voice Bonnet (×1)
- 2Raspberry Pi Zero WH (×1)
- 3Speaker (×1)
- 4microSD card (×1)
- 5Push button (×1)
- 6Button nut (×1)
- 7Button harness (×1)
- 8Standoffs (×2)
- 9Micro USB cable (×1)
- 10Speaker box cardboard (×1)
- 11Internal frame cardboard (×1)
Build your kit
Get the Latest System Image
This kit requires a special version of the Raspberry Pi operating system that includes some extra AIY software.
Although the microSD card included with your kit is pre-flashed with the AIY system image, it's out of date. So before you begin, we highly recommend you download and install the latest system image and flash it to your microSD card. Otherwise, you might encounter some old bugs and some of the sample code might not work for you.
- Download the latest
.img.xzfile from our releases page on GitHub. - Use an adapter to connect your microSD card to your computer.
- Download, install, and launch the Raspberry Pi Imager.
- Click Choose OS, scroll to the bottom, select Use custom, and find the
.img.xzfile you downloaded above. - Click Choose storage to select your microSD card and then click Write to begin flashing the SD card.
Flashing the card can take a few minutes, so start assembling the kit. Once the kit is assembled, you'll put the card into it.
Fold the internal frame

Orient the frame
Let’s start by folding the internal frame, which will hold the electrical hardware inside the box.
Lay the frame on the table in front of you like the photo. The left slit should be closer to the cardboard edge.

Fold long flap
Fold the long flap away from you and downwards along the two creases.

Fold left and right flaps
Fold the two highlighted flaps toward you.

Fold the bottom flap
Fold the bottom flap upward toward you.

Align the bottom
The slits on the bottom flap will align with two notches.

Insert the notches
Insert the notches into the slits.
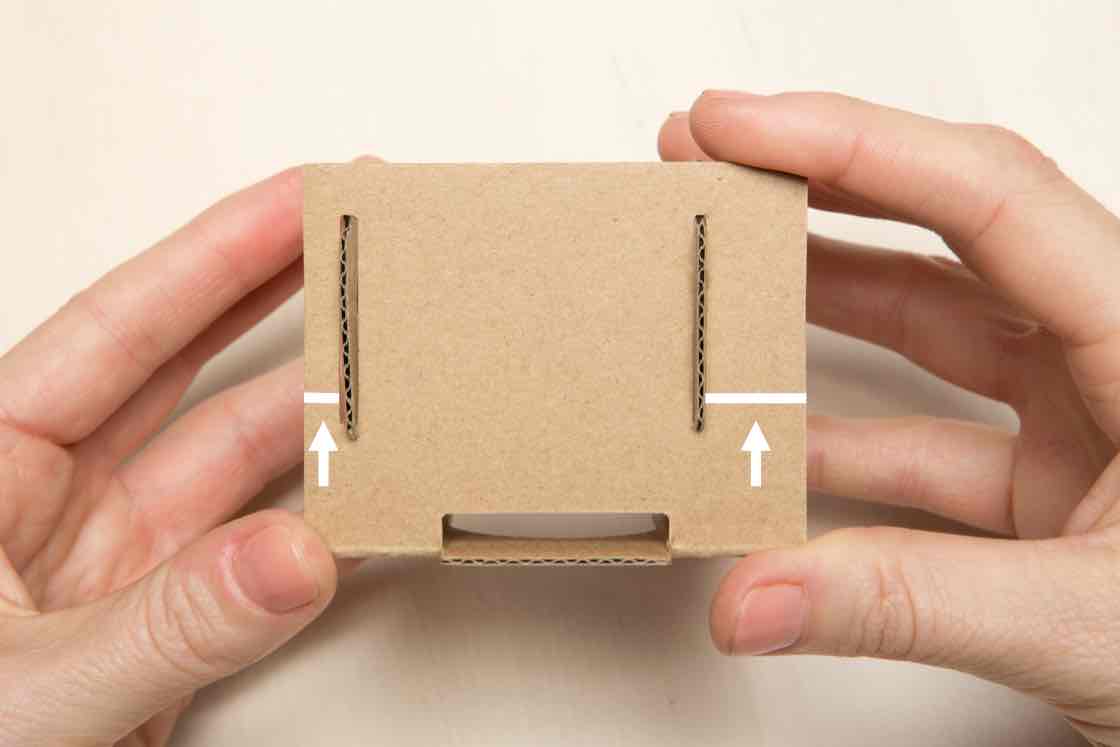
Check frame alignment
Look at the bottom of your frame. The slit closer to the edge should be on the left.
If yours looks different, you probably folded the frame the wrong way. Unfold it and check step 1 in fold the internal frame.

Set the frame aside
The internal frame is built. Set it aside for now; we’ll need in the next phase.
Connect the boards
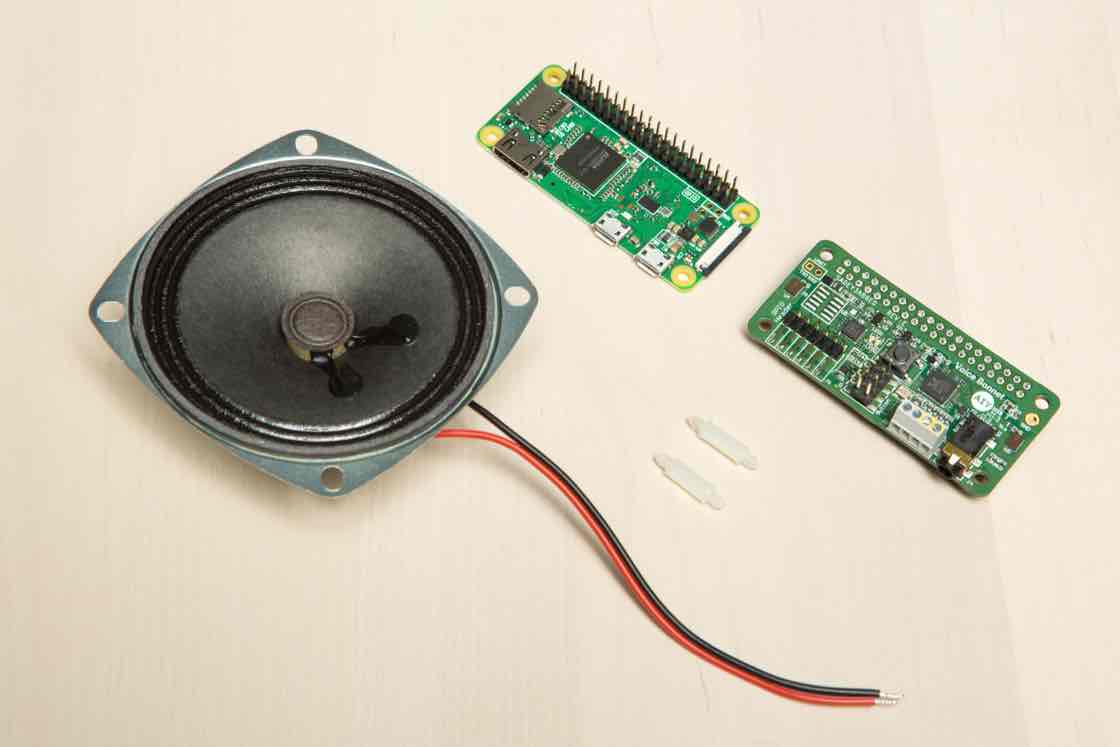
Gather your boards and speaker
Now it’s time to connect all the electrical hardware together. Gather your:
- Raspberry Pi
- Voice Bonnet board
- Standoffs (x2)
- Speaker
What are these boards for? The Raspberry Pi circuit board is small but mighty computer. The Voice Bonnet adds 2 microphones, a speaker connector, an LED button connector, and a special audio codec processor.
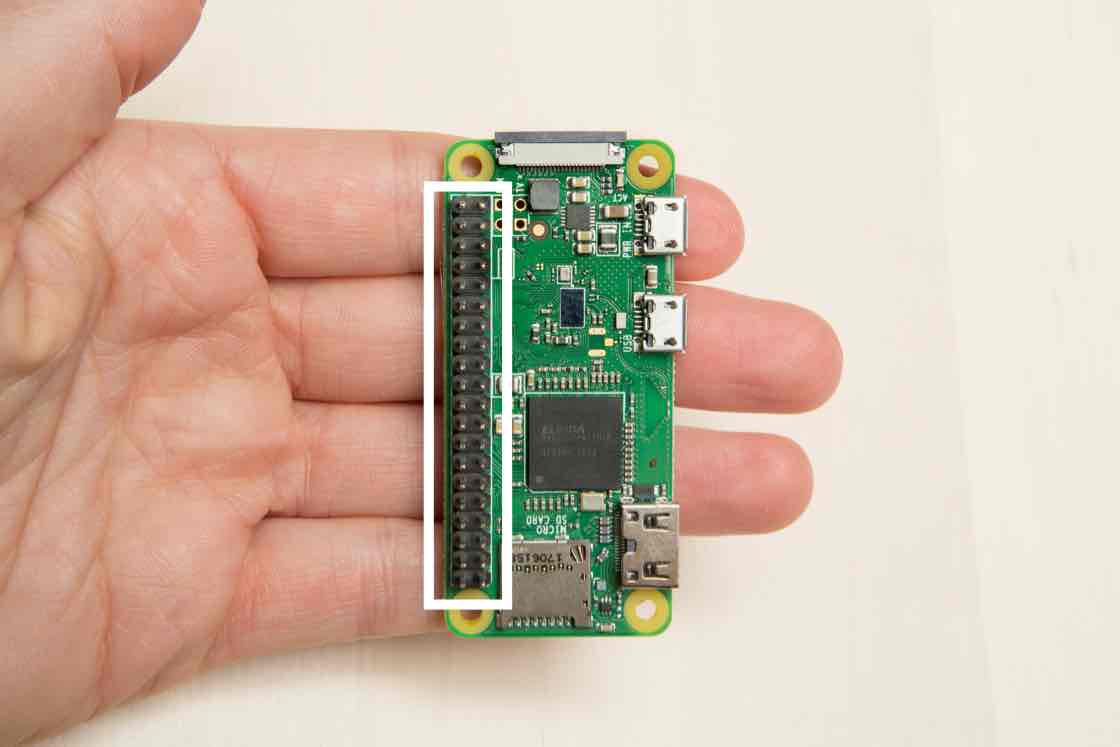
Orient your Raspberry Pi
Find your the Raspberry Pi board and orient it so that the 40-pin header is on the left edge of the board, like the photo.
WARNING: First make sure your Raspberry Pi is disconnected from any power source and other components. Failure to do so may result in electric shock, serious injury, death, fire or damage to your board or other components and equipment.
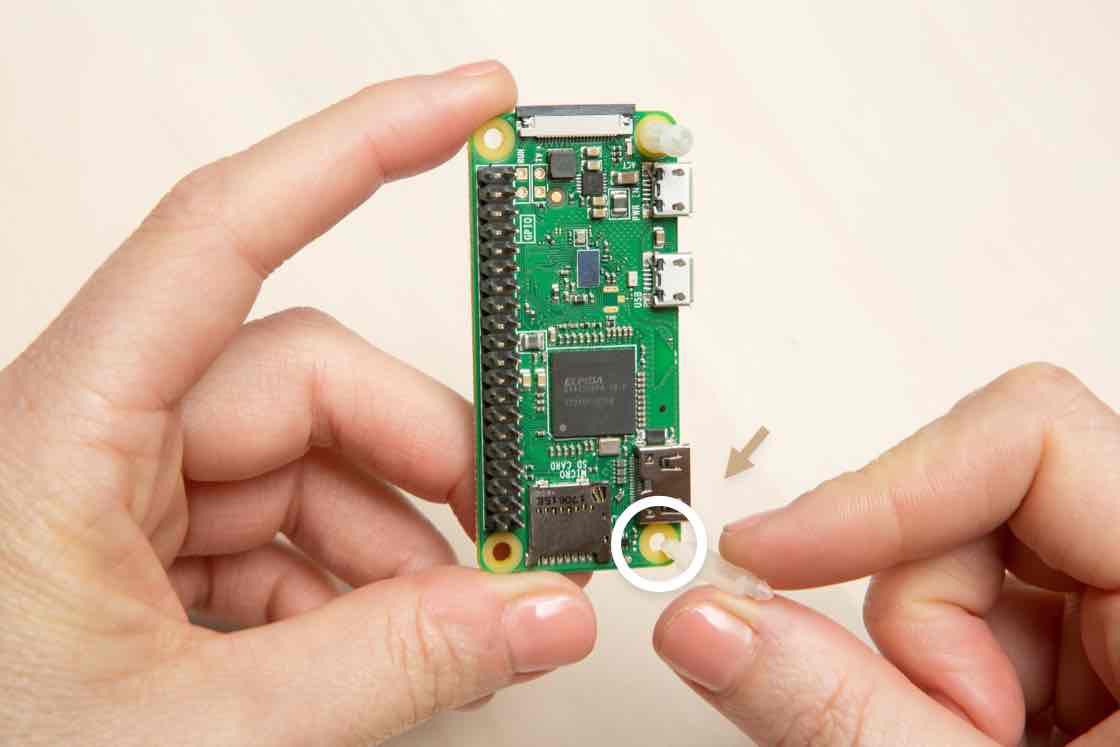
Insert standoffs
Holding the board in your hand, insert the standoffs into the holes on the right edge of the board, opposite the header.
It will take a firm push to get the standoffs to click in, so you should support the board from underneath so it doesn’t bend too much.
It’s always best to hold the board by the edges (not by the top and bottom surfaces).
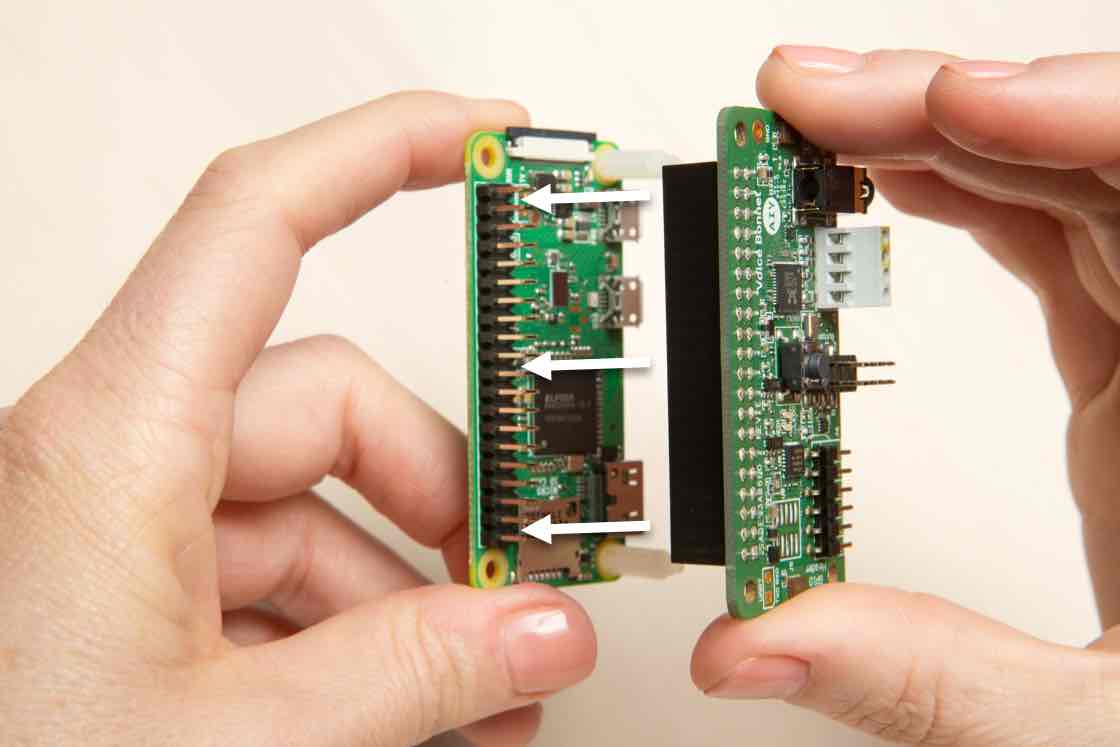
Connect the boards
Grab your Voice Bonnet board. It has a header connector on the bottom of the board.
Align the header connector with the pin header on the Raspberry Pi, then press down to connect the headers. Firmly push on the other side of the Voice Bonnet to snap the standoffs into place. Push near the standoffs, not in the center of the board.

Check connections
Make sure the standoffs have snapped into the boards and that the 40-pin header is pushed all the way down so that there is no gap between the two boards.
WARNING: Failure to securely seat the Voice Bonnet may cause electric shock, short, or start a fire, and lead to serious injury, death, or damage to property.
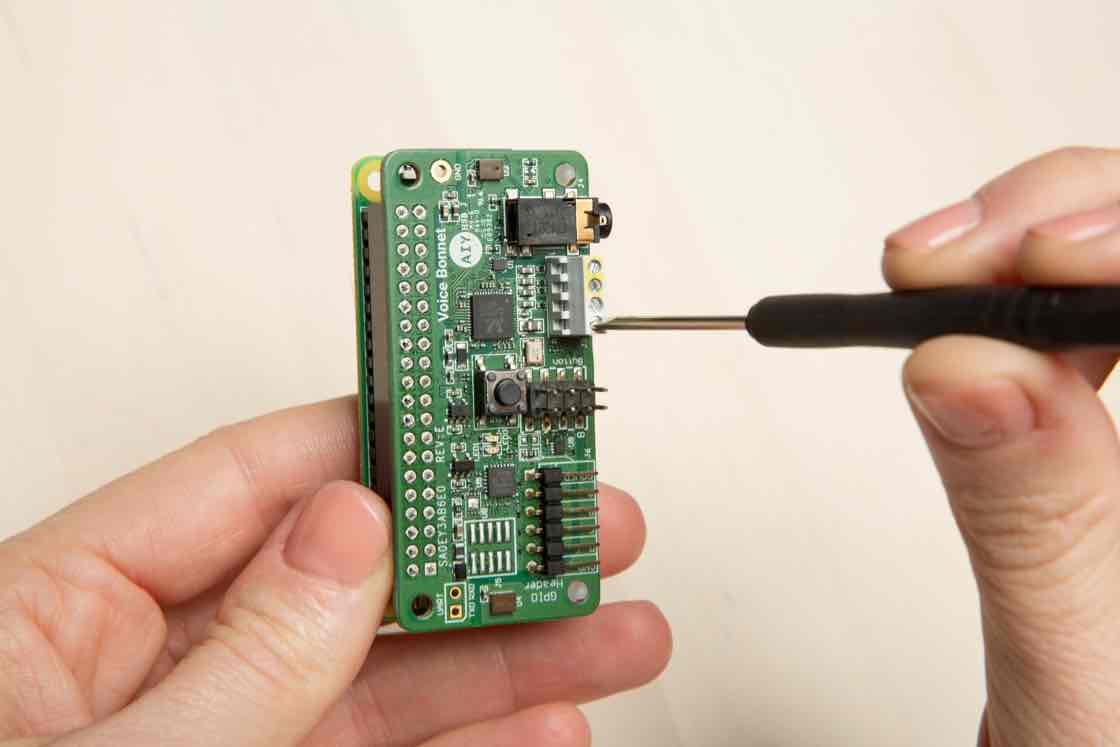
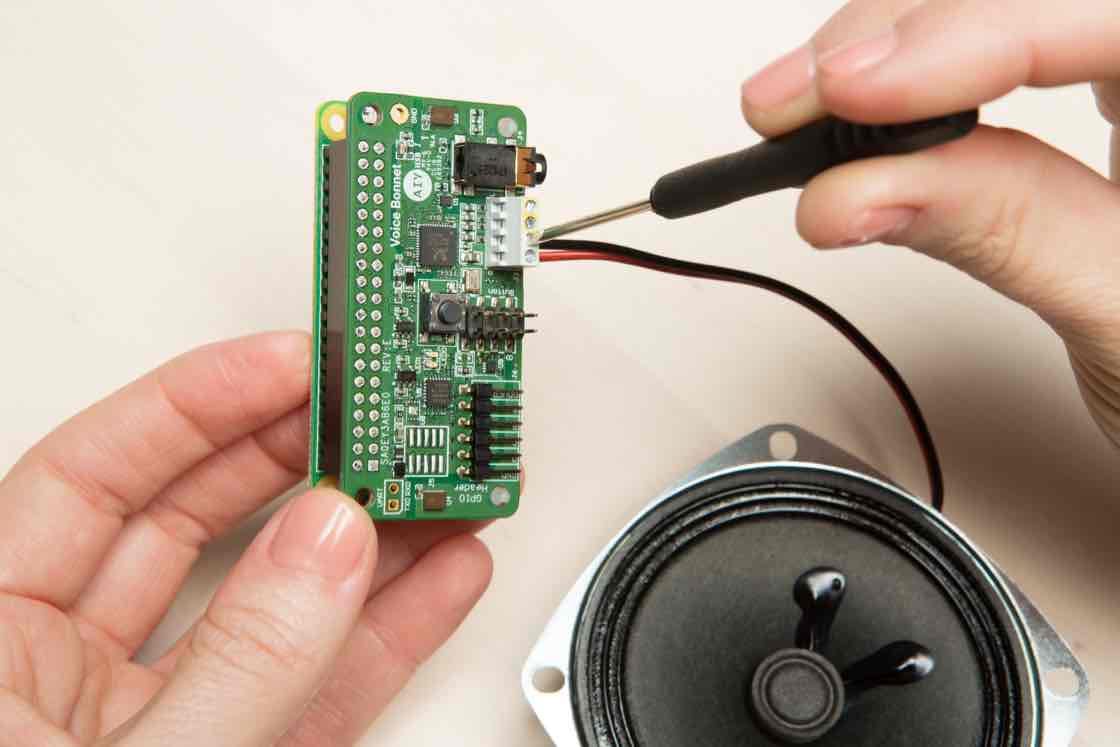
Loosen screws
Grab your 2mm screwdriver and loosen the two bottom screws of the screw terminal so that you can insert the speaker wires.
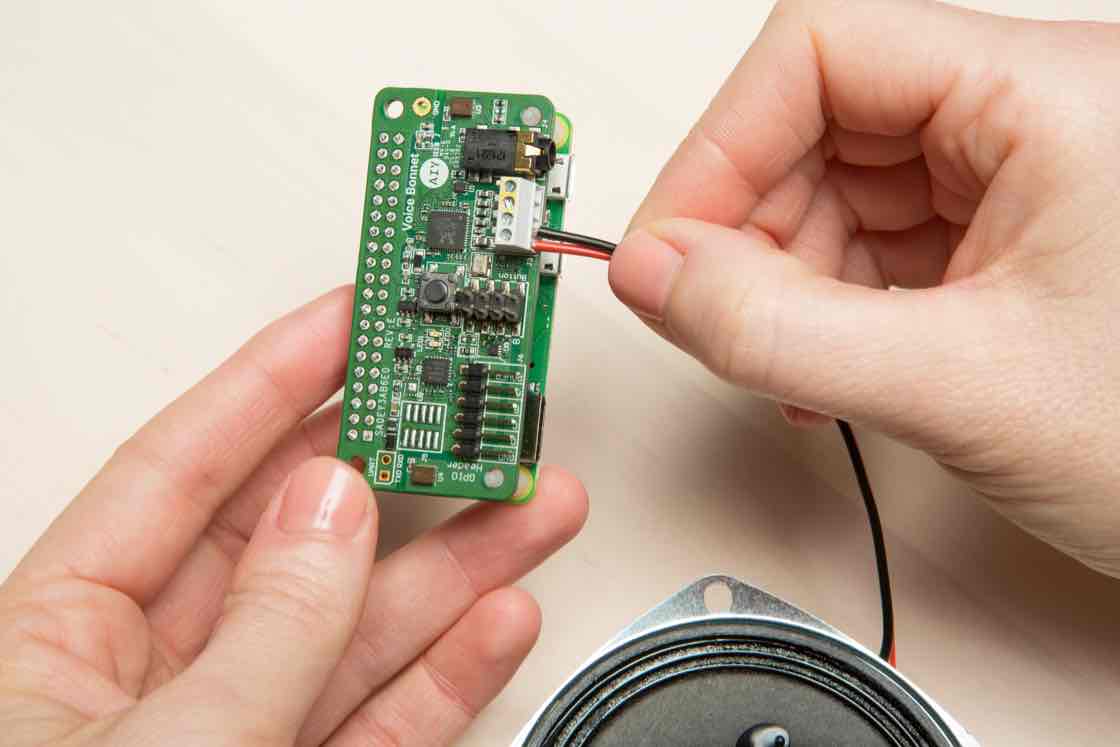
Insert speaker wires
Take your speaker and find the red and black wires attached to it. Insert the red wire into the bottom slot of the left-most terminal and gently push it in as far as you can. Do the same for the black wire in the second terminal from the left.
What are the speaker wires for? The red and black wires transmit electrical signals which are converted to sound by the speaker.
Secure wires
Secure the wires by using your 2mm screwdriver to turn the screws clockwise.
WARNING: Failure to secure the wires or leaving wires exposed may cause electric shock, short, or start a fire, and lead to serious injury, death, or damage to property.
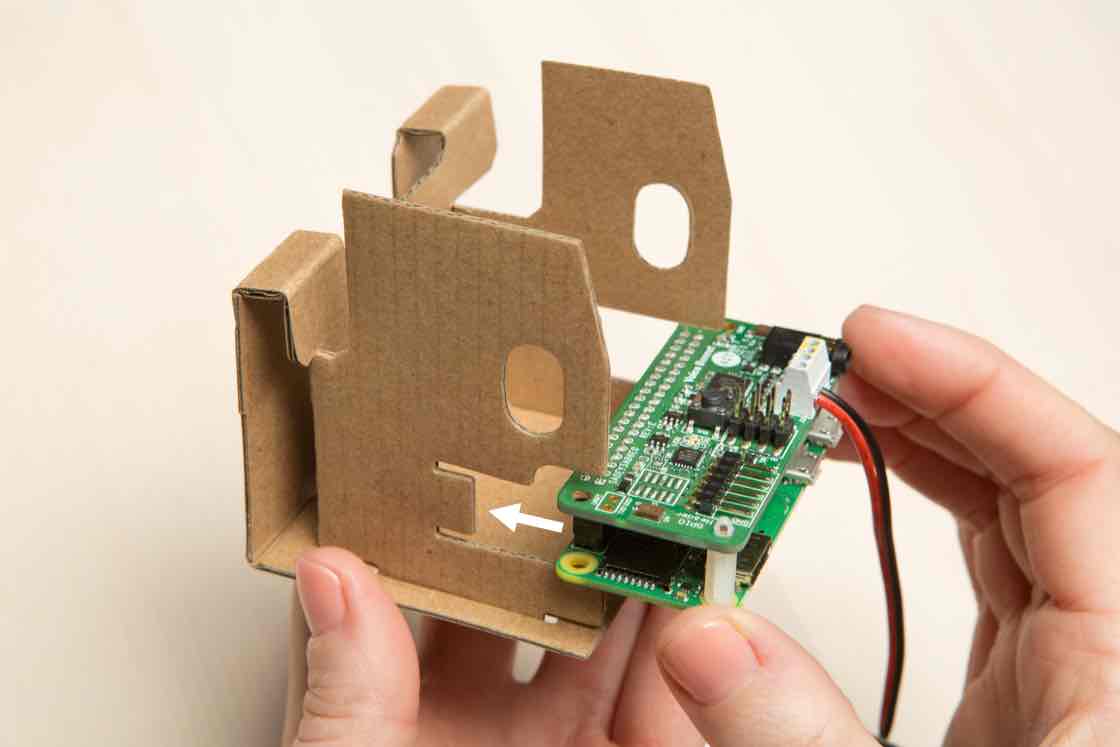
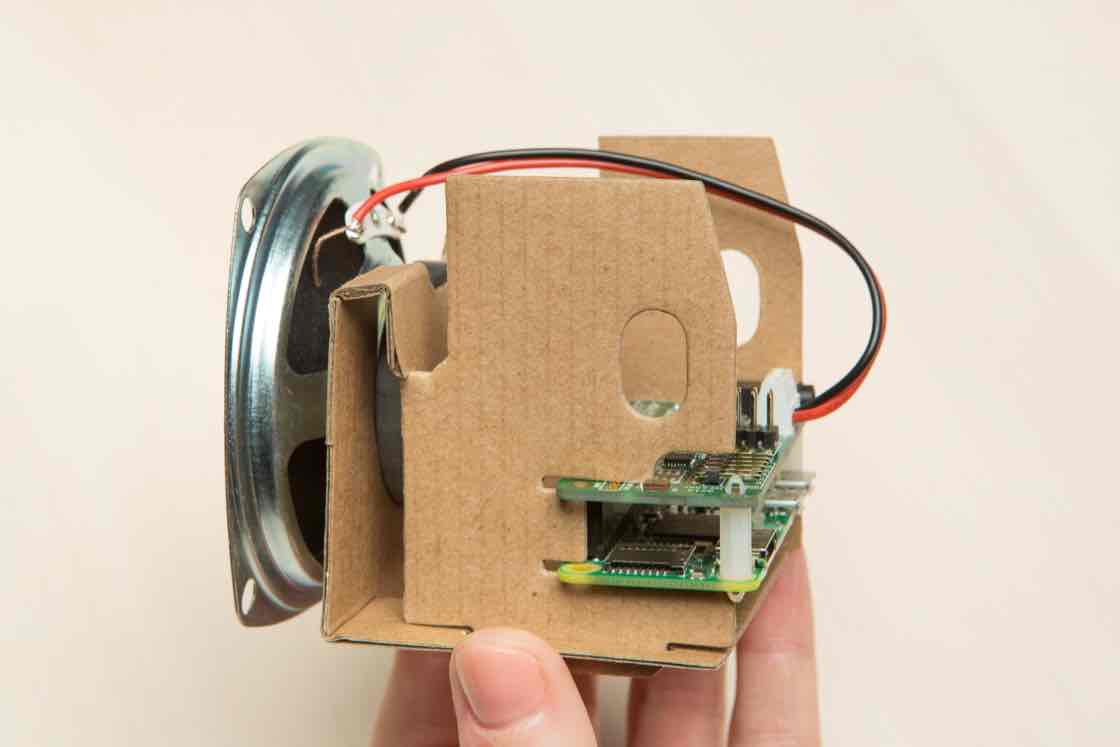
Add boards to the frame
Now that your speaker is connected to the terminals, we can put the boards into the internal frame.
Slide the boards into the internal frame you folded earlier. The board slides into a slot that looks like a mouth :o
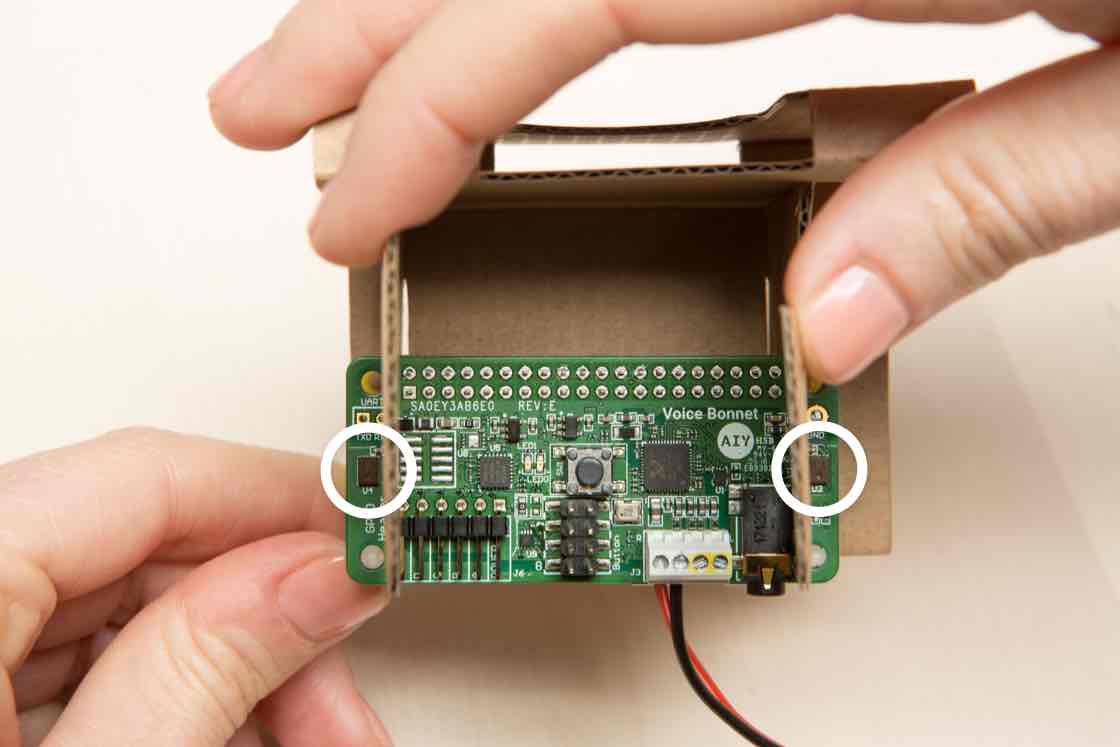
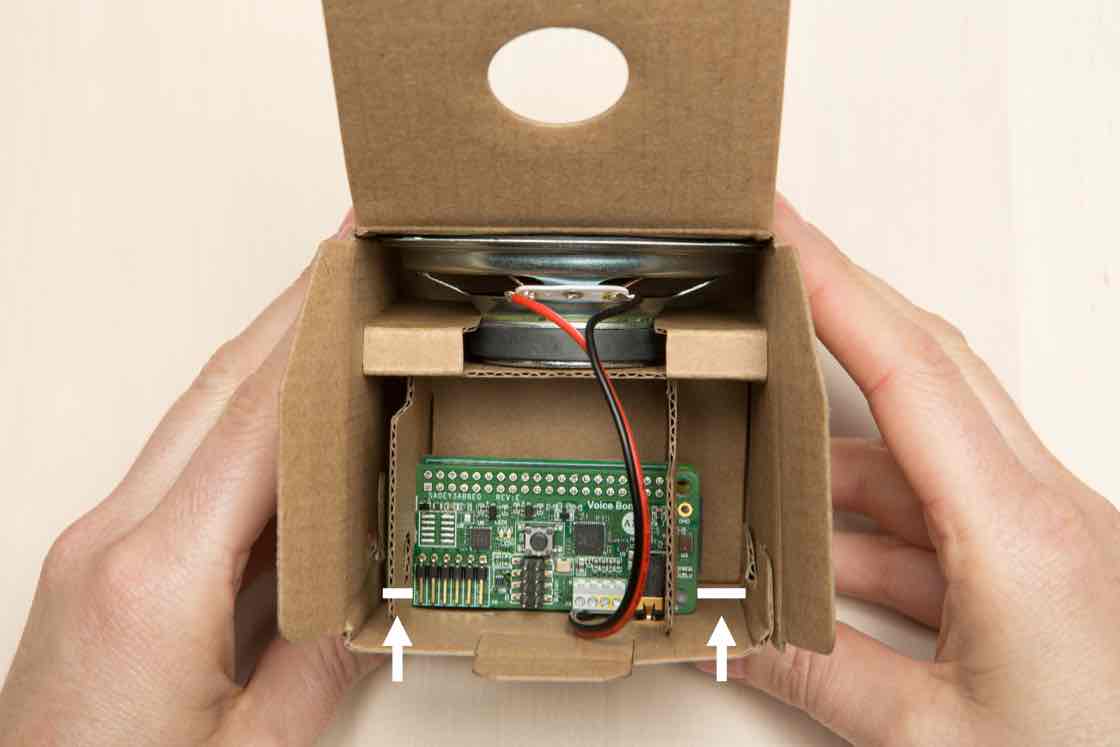
Check board alignment
The microphones on the left and right edges of the board (circled in white) should be outside the internal frame.
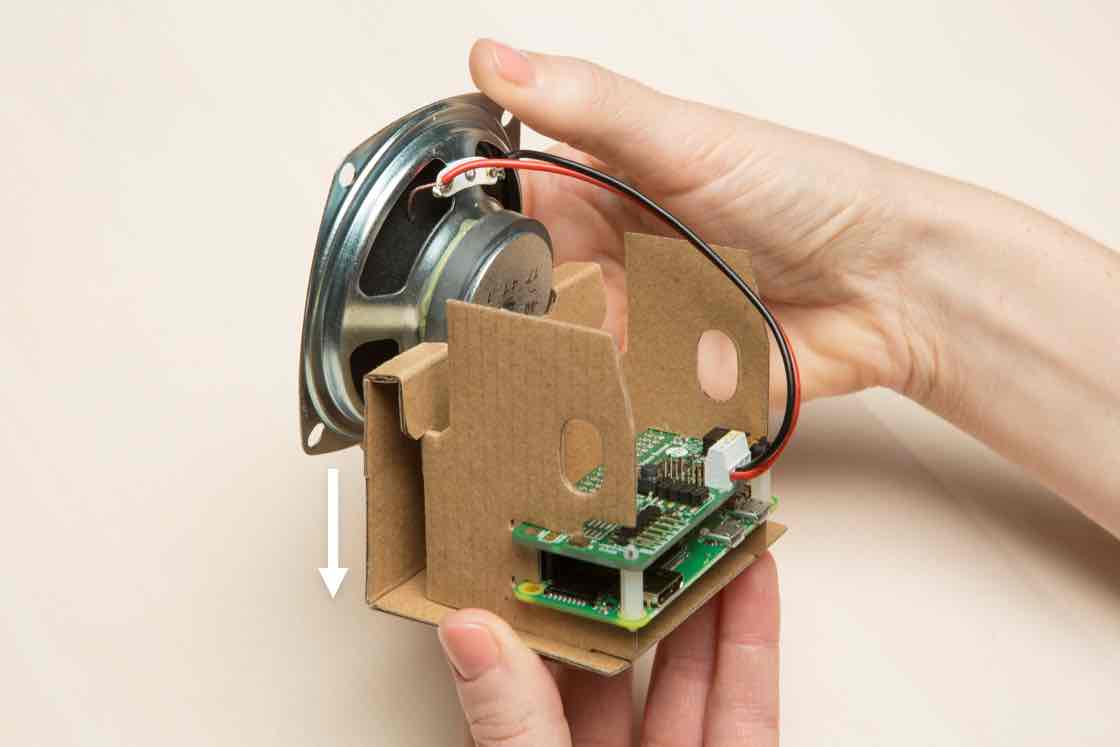
Insert speaker
Slide the speaker down into the internal frame.
WARNING: The speaker contains magnets and should be kept out of reach of children and may interfere with medical implants and pacemakers.
Check that the speaker is secure
Make sure the speaker is snug and secure.
Now that your electrical hardware is secure on the cardboard frame, let’s build the box it goes into.
Put it all in the box
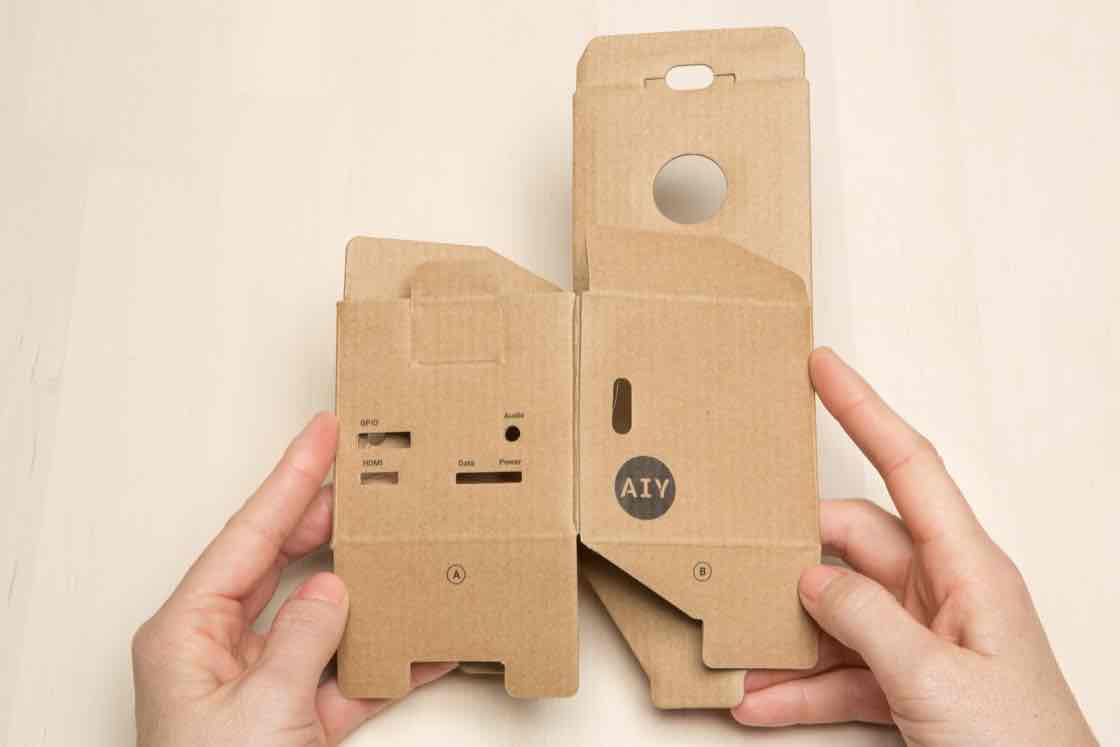
Open the speaker box
Find the speaker box cardboard and pop it open by squeezing along the edges of the box.
Fold flap A
Fold flap A down into the box.
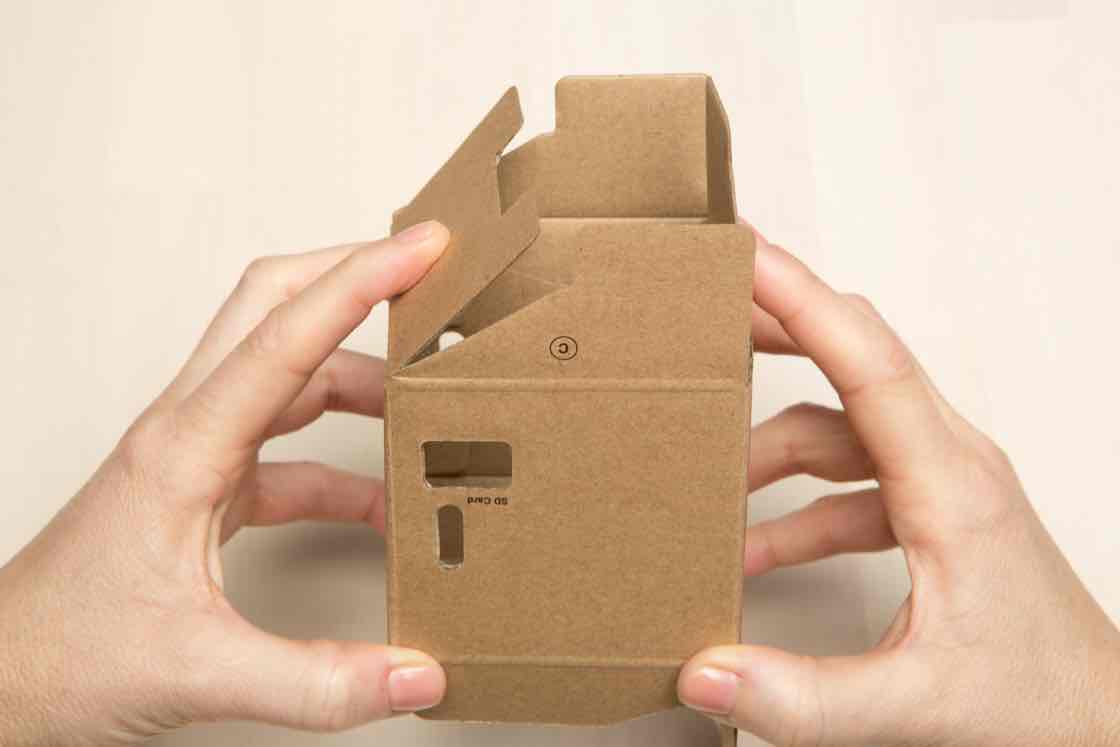
Fold flaps B and C
Then fold flaps B and C down into the box.
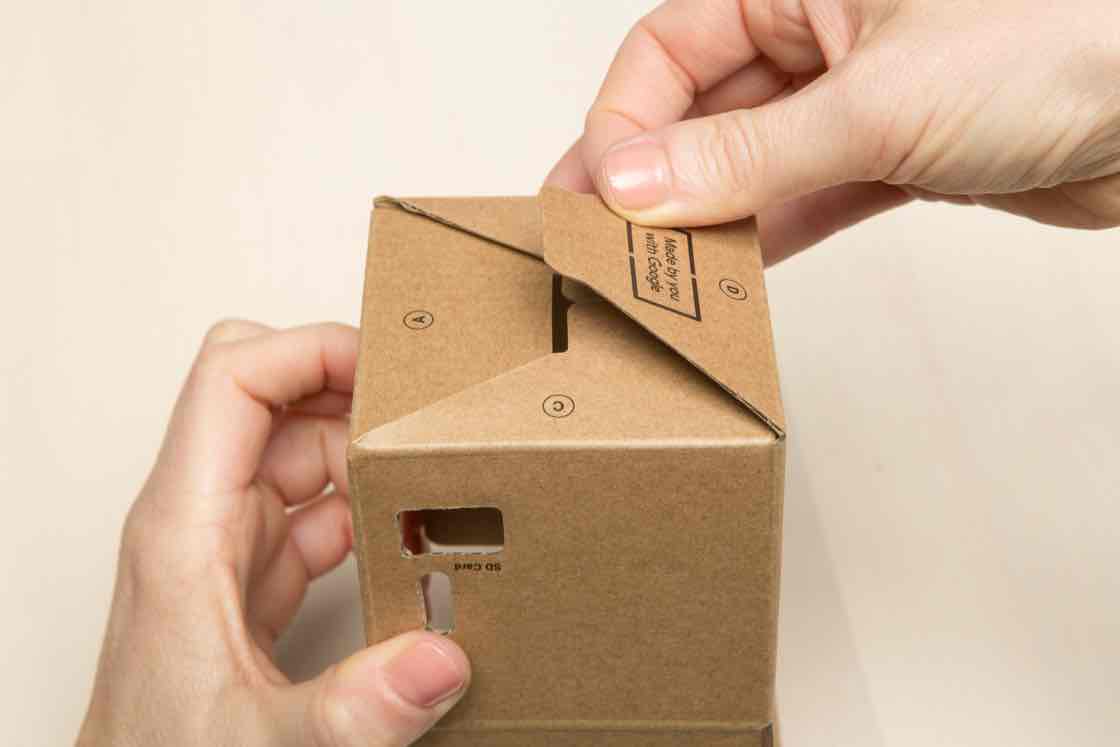
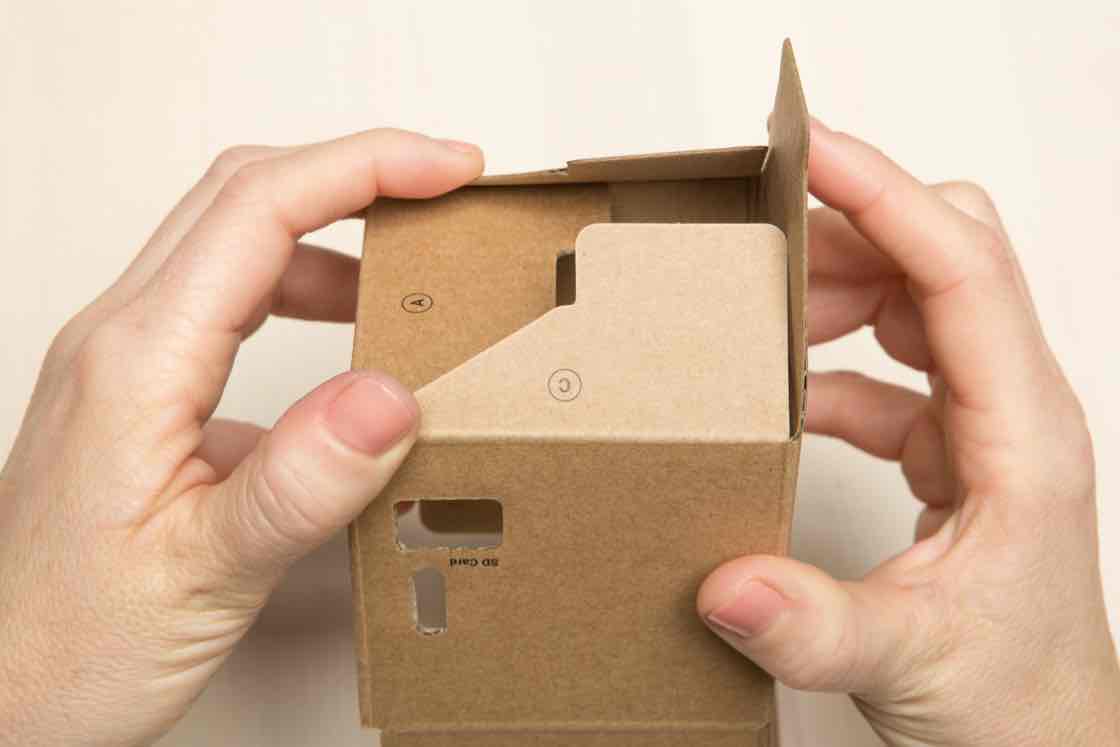
Fold flap D
Lastly, fold flap D down, pressing until it locks into place.
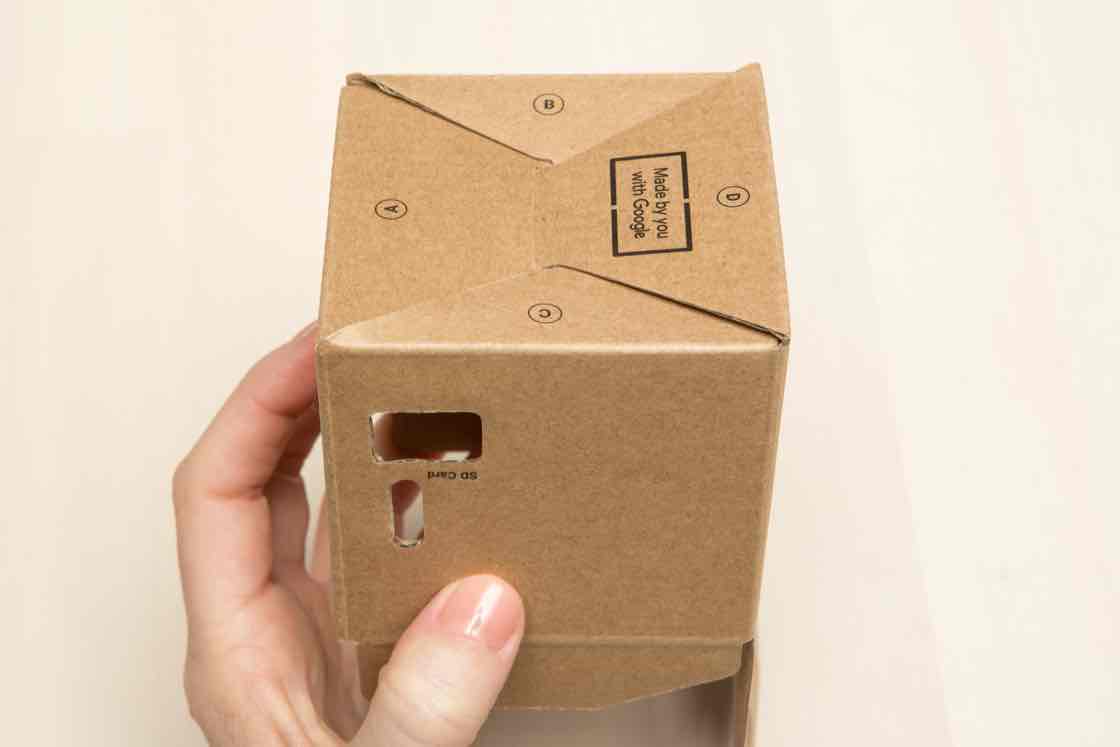
Check the box bottom
The bottom should be secure. In the next step we’ll bring it all together.
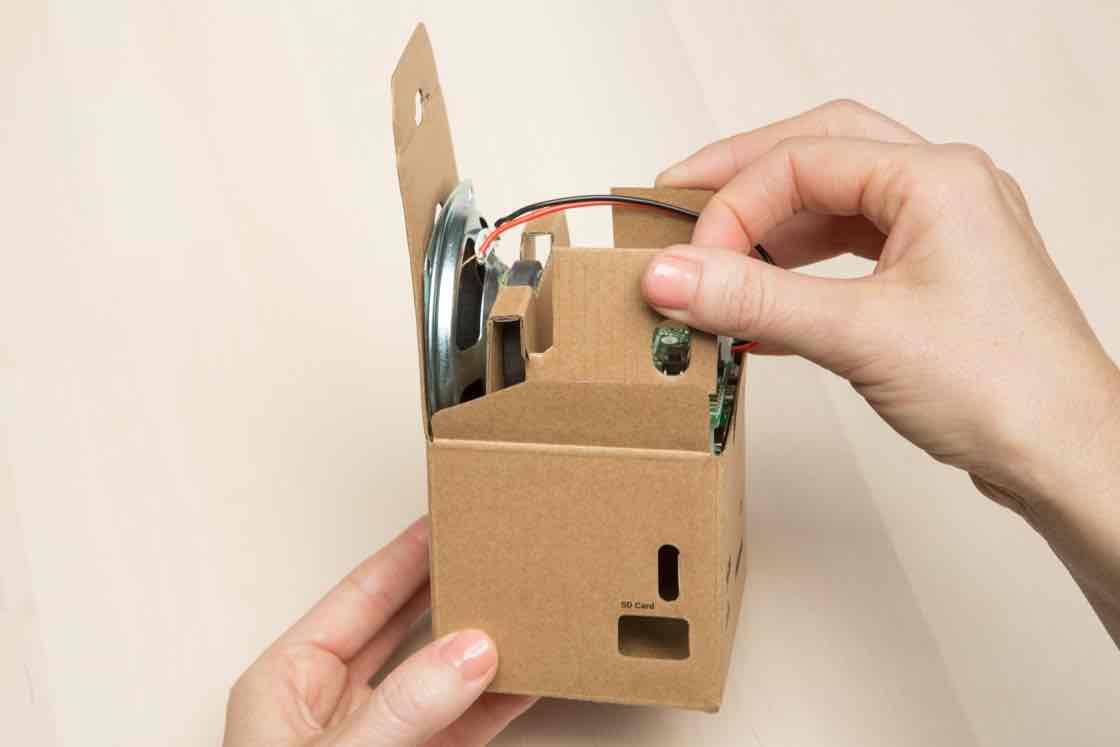
Slide the internal frame inside
Slide the internal frame into the speaker box. Make sure the speaker is lined up with the side of the cardboard box that has circular holes.
Check alignment of internal frame
Once it’s in, check the sides of the internal frame. There should be more space between the internal frame and the right side of the speaker box.
Yours looks different? If the inside of your box looks different, you might need to fold the internal frame the other way. Check step 7 in fold the internal frame for more help.

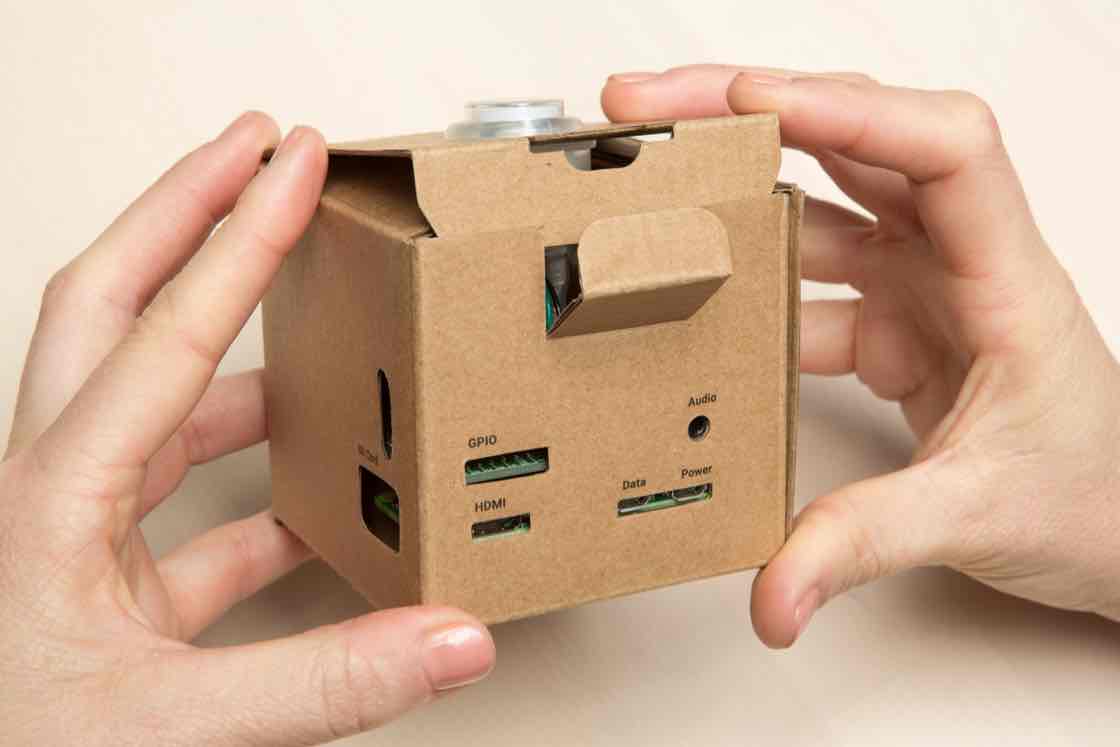
Check connectors
Make sure the connectors are lined up with the cardboard cutouts. The connectors are used to plug in things like your SD card and power.
WARNING: Forcing connectors into misaligned ports may result in loose or detached connectors. Loose wires in the box can cause electric shock, shorts, or start a fire, which can lead to serious injury, death or damage to property.
Yours looks different? If your connectors don’t line up, you may have inserted the internal frame the wrong way. Check step 26 in put it all in the box for more help.
Add the button

Gather your pieces
It’s time to add the button. From your kit, round up the:
- Push button
- Button nut
- Button harness
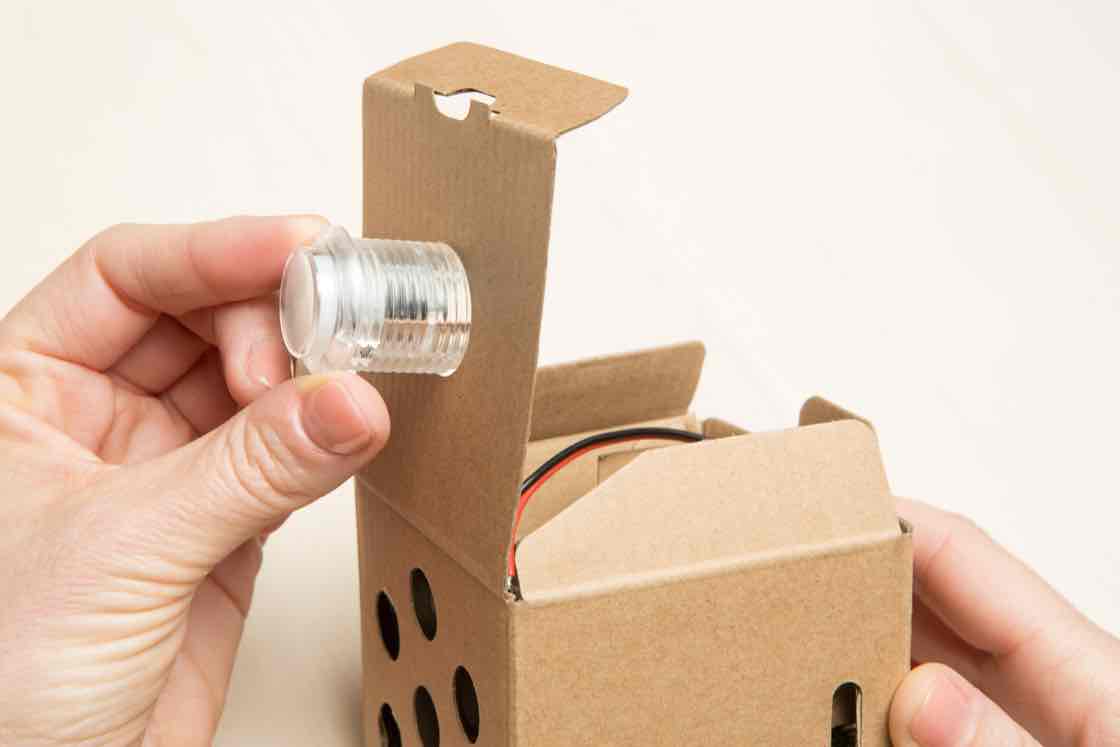
Insert the push button
Insert the push button into the hole on the top of your cardboard box.
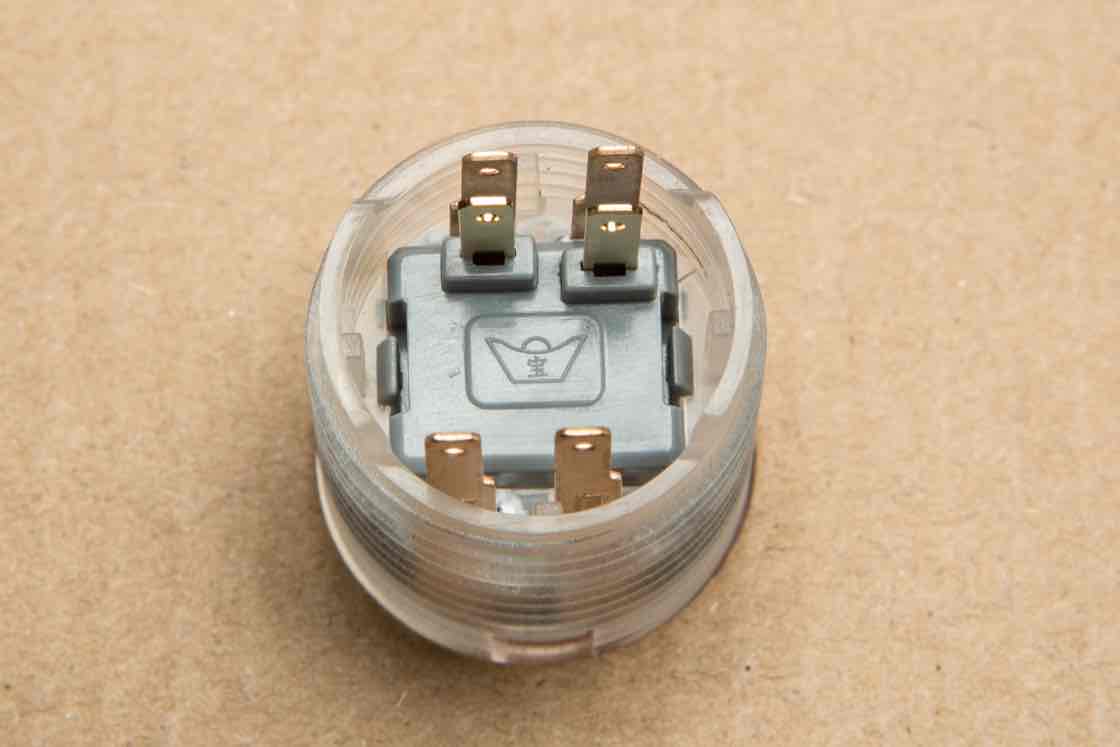
Orient the button
On the other side, orient the button so that the side with four prongs is on the top (check the photo).
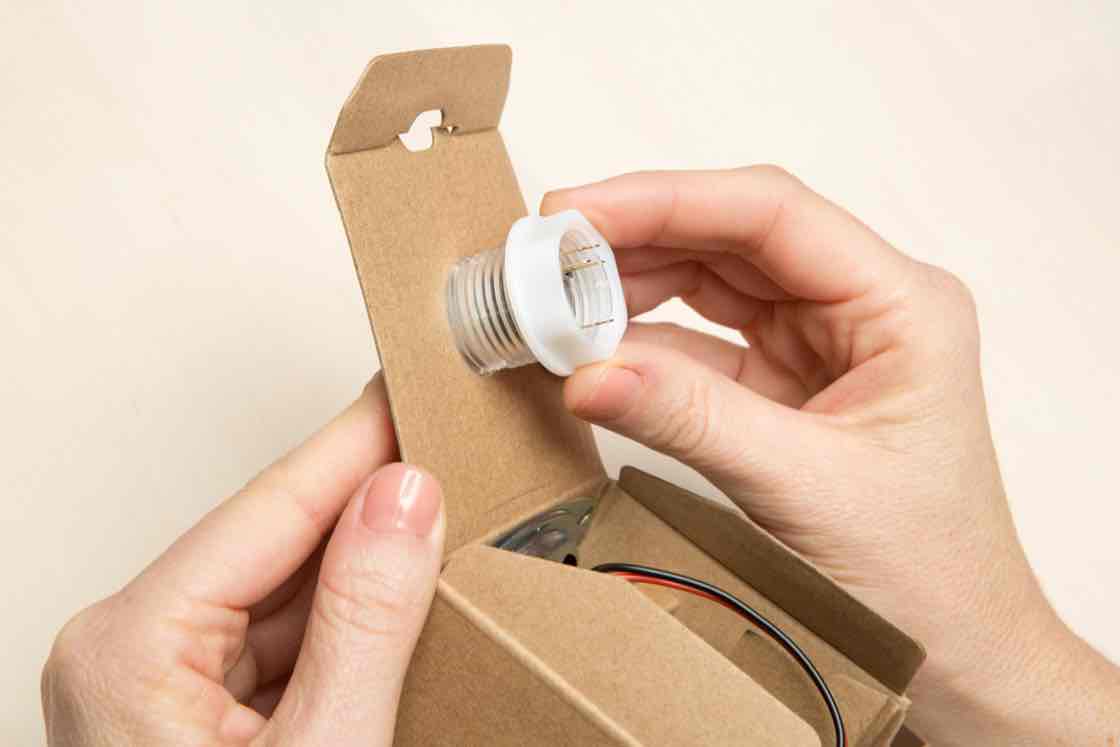
Screw on the button nut
Screw on the button nut to secure the button in place.
Make sure the wider, flanged side of the nut is facing the cardboard flap.
Make sure your button is still oriented so the four prongs are on top.
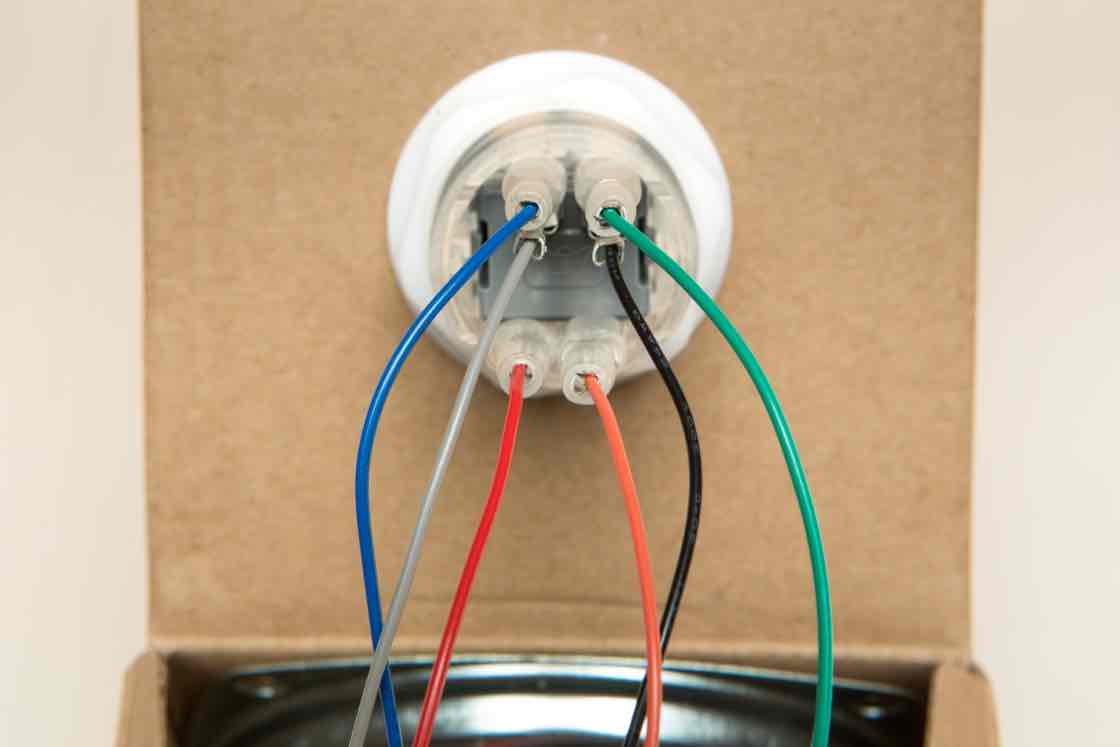
Plug in your wires
Now it’s time to plug in the wires on the button harness. Take the button harness and find the end with six individually colored wires.
Plug each of those wires in the correct slot by matching its color to the image.
- Top row: blue and green
- Middle row: grey and black
- Bottom row: red and orange
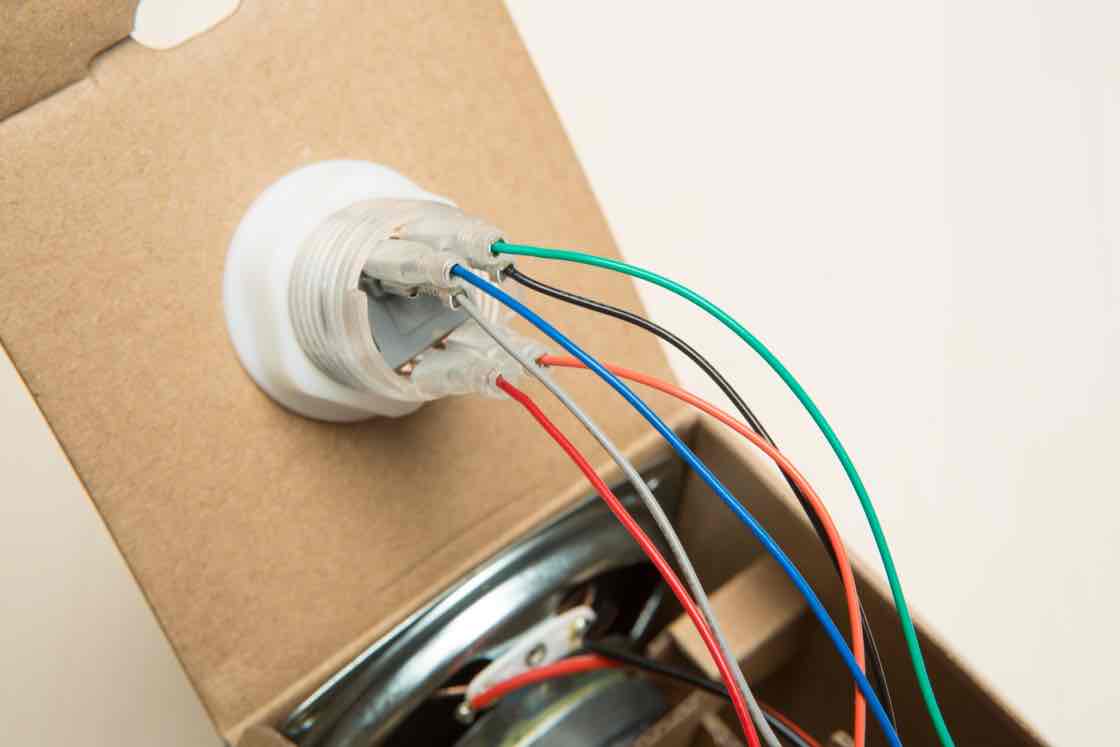
Check wires
Double-check to make sure your wires are plugged in the same way as the image.
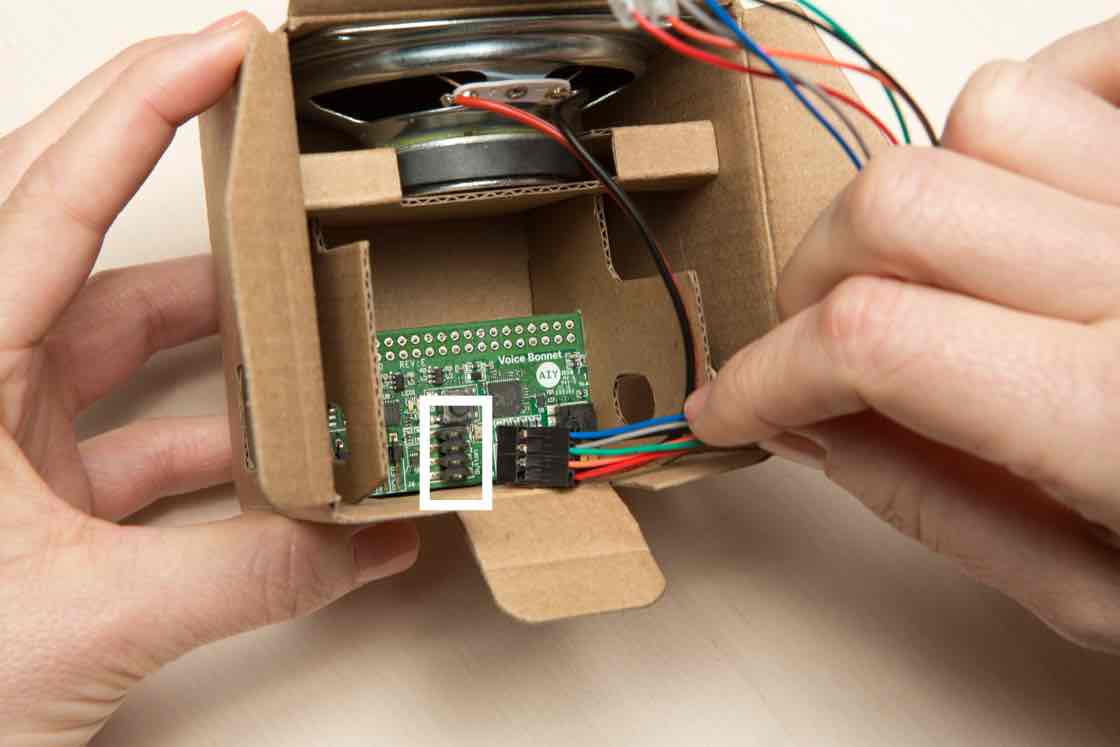
Find the 8-pin connector on the Voice Bonnet
To plug in the button harness, first find the 8-pin connector on your Voice Bonnet board, outlined in a white rectangle in the photo.
With the speaker facing away from you, plug the black wire into the top-right slot. Plug the blue wire into the top-left slot. Double check to make sure this is correct.
WARNING: Failure to securely seat the connector may cause electric shock, short, or start a fire, and lead to serious injury, death, or damage to property.

Fold the top flaps
Close your box by folding down the top flaps.
Tuck in the tab
Secure the box by tucking in the tab.
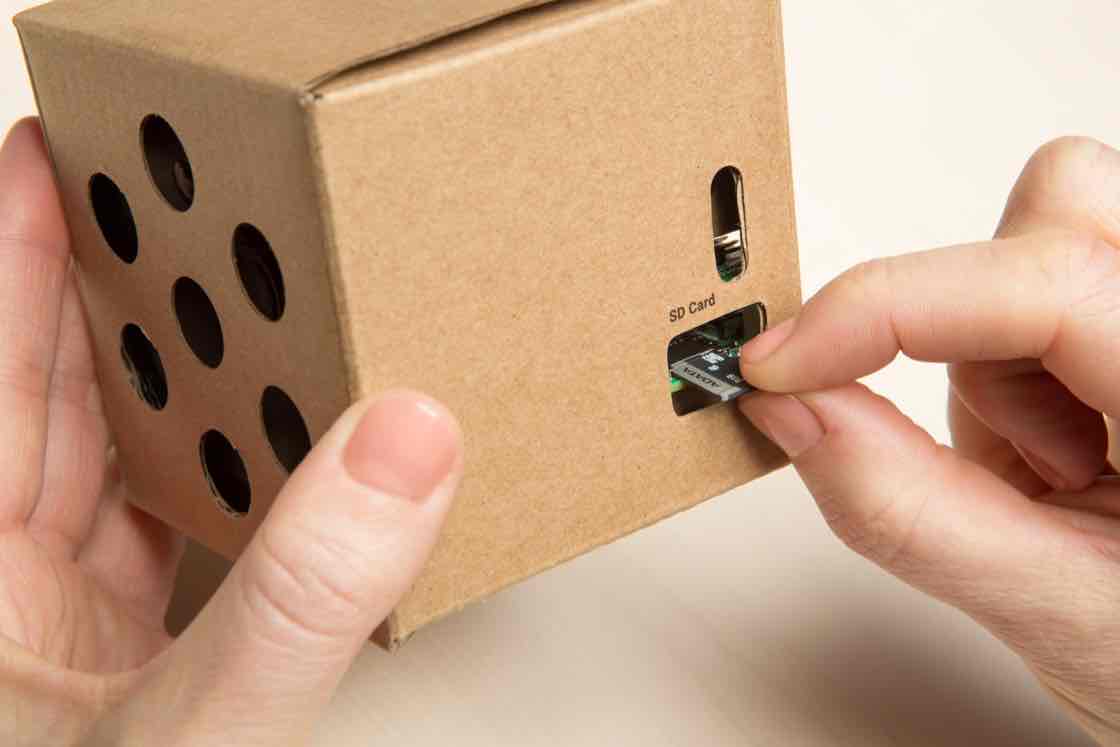
Insert the SD card
The SD card is pre-loaded with all the software you need.
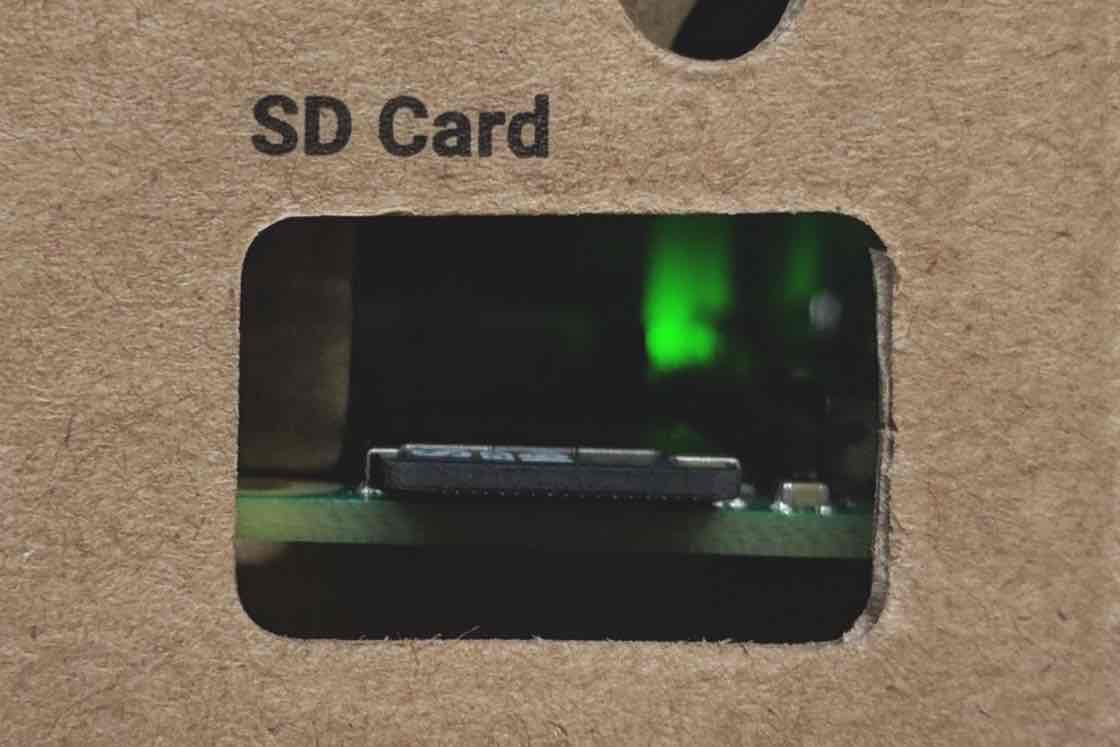
With the arrow side facing up, insert your SD card into the silver slot on the Raspberry Pi, which you can find through the cardboard cutout labeled SD Card.
Congrats, you’ve just assembled the Voice Kit hardware!
Now you’re ready to connect your kit to the Google Assistant.
Feedback
How did assembling your Voice Kit hardware go?
Connect to your kit
Select an option
There are two ways to connect your kit to Wi-Fi and get an IP Address, depending on what you have available. There are two options for connecting, explained in Meet your kit.
Follow instructions for one connection option, either with the AIY Projects app or with a monitor, mouse, and keyboard.
Option 1: AIY Projects App

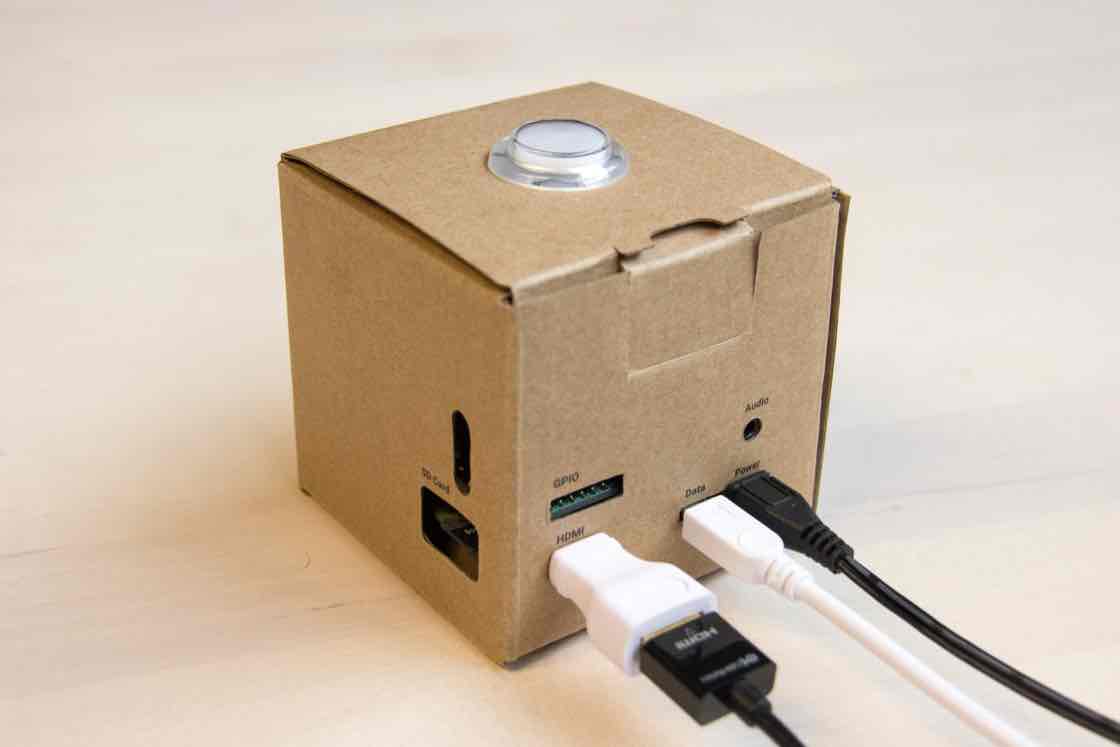
Plug your Voice Kit into a power supply
Plug your Voice Kit into your power supply through the port labeled Power.
See Meet your kit for power supply options. Do not plug your Voice Kit into a computer for power.

Let it boot up
To confirm that it’s connected to power, look into the hole in the cardboard labeled SD Card. You’ll see a green LED flashing on the Raspberry Pi board.
Wait about four minutes to allow your device to boot. You’ll know when it’s booted when the LED light stops flashing and remains lit.
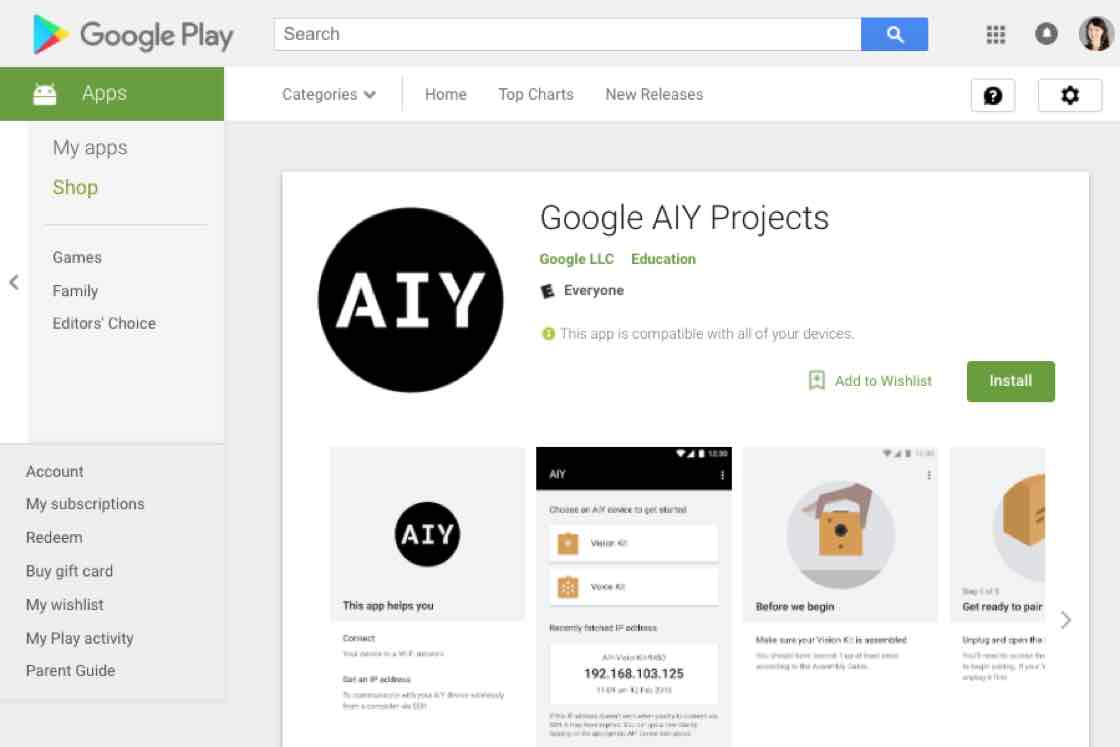
Download the AIY Projects app
From your Android device, go to the Google Play Store and download the AIY Projects app.
This app will allow you to connect your Voice Kit to a Wi-Fi network, and display an IP address to communicate with your Voice Kit wirelessly via a separate computer and SSH.
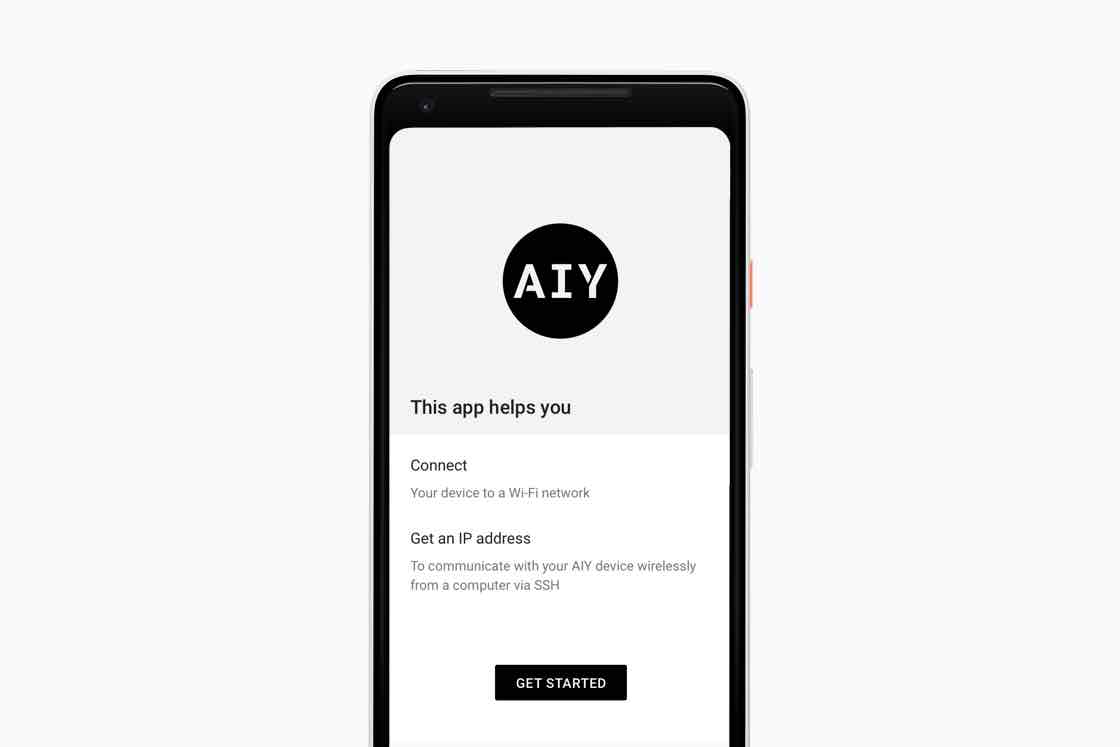
Follow app instructions
Open the app and follow the onscreen instructions to pair with your Voice Kit.
Take note of the IP address — you’ll need it later. The app will also remember and display it on the home screen.
Move to the next section, Log in to your kit.
Not working? Make sure your Voice Kit is still connected to a power supply.
If you run into errors, quit the app and try again.
If the device won’t pair, make sure the green LED on the Voice Bonnet is flashing. If it’s not flashing, it may have timed out. Press and hold the Voice Bonnet button for 5 seconds, and try again. If that doesn’t work, try restarting your phone.
Feedback
How did it go connecting your Voice Kit to Wi-Fi and getting an IP address?
Option 2: With Monitor, Mouse, and Keyboard

Gather your peripherals
Use connection option if you don’t have access to a second computer and Android smartphone, or if you prefer to connect directly to your Raspberry Pi.
You’ll need a set of peripherals to interact with your Raspberry Pi, including a monitor, keyboard and mouse. Check here for suggestions.
Connect peripherals
Before plugging into power, plug in your monitor into the HDMI port and your keyboard and mouse into the port labeled Data on your Voice Kit using one of the adapters described in Meet your kit.
Plug your Voice Kit into a power supply
Connect your power supply to the Raspberry Pi. To confirm that it’s connected to power, look into the hole in the cardboard labeled SD Card. You’ll see a green LED flashing on the Raspberry Pi board.
Let it boot up
When you plug it in, you’ll see the Raspberry Pi logo in the top left corner of the screen.
Wait about four minutes to allow your device to boot. You’ll know when it’s booted when the LED light stops flashing and remains lit.
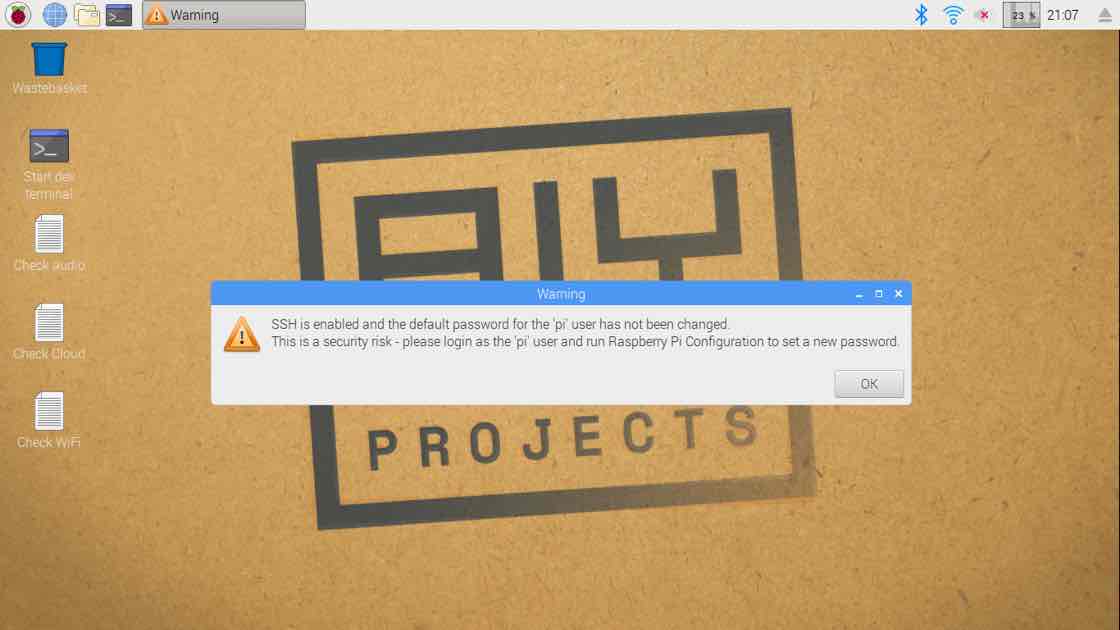
Acknowledge the warning
You’ll see a desktop with the AIY logo on the background. A warning pop-up will tell you the password for the Raspberry Pi user is set to the default. This is important if you plan to use this kit in other projects or expose it to the internet, but for now, it's safe to click OK.
Do I need to change my password? You'll want to change the Raspberry Pi user's password if you plan on using this kit in a project that is exposed to the open internet. It's not safe to expose it with a password everybody knows. If you plan on doing this, you'll want to use the passwd program. This is an advanced step, so for the purposes of this guide, we will assume you haven't changed the password for the Raspberry Pi user.
Note If you do change the password, make sure you keep your password written down somewhere safe in case you forget. It's not easy to recover it if you change it.
Connect to Wi-Fi
Using your mouse, click on the Wi-Fi connection icon at the bar at the top right of the screen. Look for your Wi-Fi network name (also known as an SSID) and click on it. If you have a password, a dialog will appear asking for the pre-shared key. Enter your password here and click OK.
Check Wi-Fi
Watch the Wi-Fi icon you just clicked on to bring up the menu. It should begin flashing. Once it's gone solid, you are connected.

Find IP address
You'll need to know the Raspberry Pi’s IP address so you can SSH to it from your computer in steps below.
You can find it by hovering over the Wi-Fi icon. It will look something like 192.168.0.0 or 10.0.0.0 and prefixed with wlan0
Write down the IP address for now.
Feedback
How did it go connecting your Voice Kit to Wi-Fi and getting an IP address?
Setup the Assistant
SSH to Your Kit
Check your Wi-Fi
Make sure your computer is on the same Wi-Fi network as the kit.
Now we’re going to connect to your kit through SSH and set things up so it can talk to the Google Assistant in the cloud.

Get your terminal ready
We’re going to connect your computer to the Raspberry Pi using SSH in a terminal.
If you’re familiar with using a terminal, start an SSH session with pi@192.168.0.0 (but using your Raspberry Pi's real IP address from above), then skip to step 7.
If you're not familiar with a terminal, download and install the Chrome browser and Secure Shell Extension, and proceed to the next step.
Open the Secure Shell Extension
Once the extension is installed, open it.
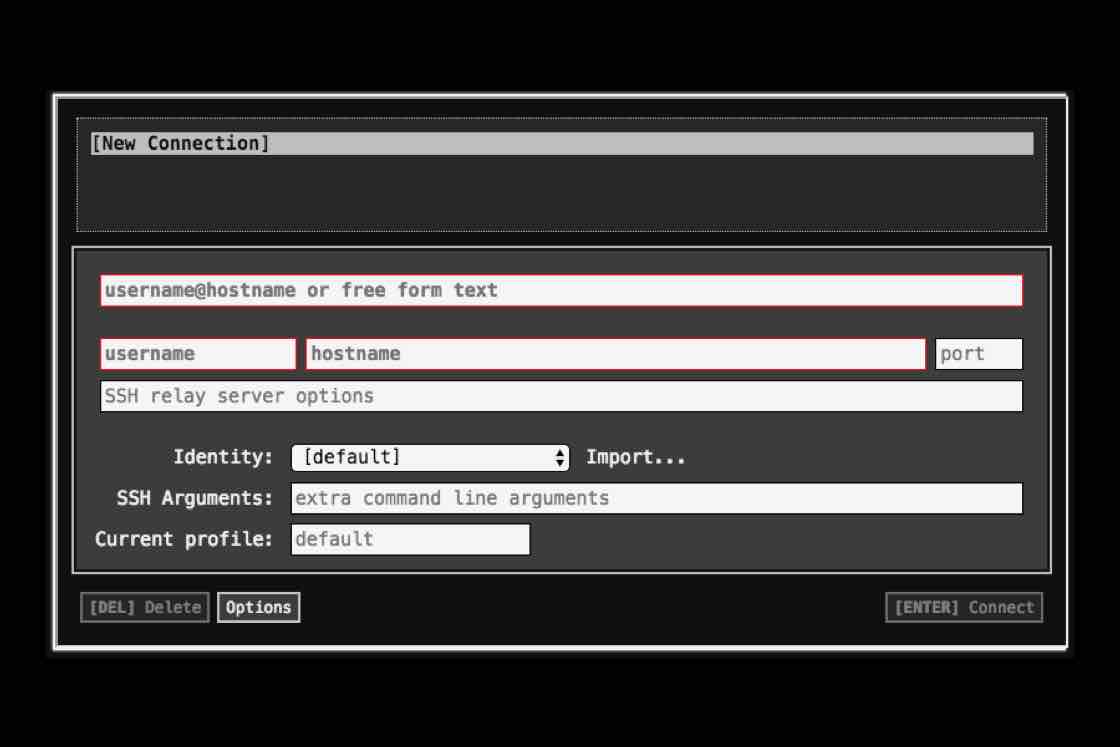
If you’re using Chrome on a Windows, Mac, or Linux computer, you should see the Secure Shell Extension icon ![]() in the toolbar (look to the right of the address bar). Click that icon and then select Connection Dialog in the menu that appears.
in the toolbar (look to the right of the address bar). Click that icon and then select Connection Dialog in the menu that appears.
If you’re using Chrome on a Chromebook, go to the app menu and type "secure shell app extension".
Connect to the Raspberry Pi
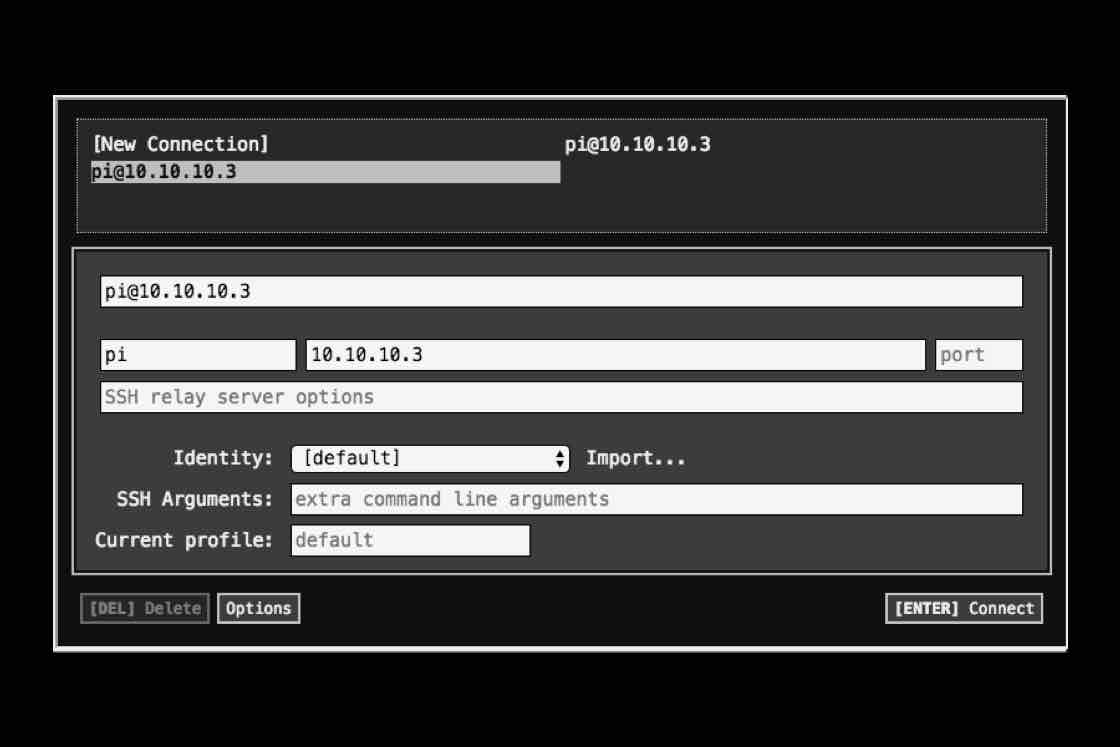
In the top field, type pi@192.168.0.0, but replacing those numbers with the real IP address of your Raspberry Pi. After typing this in, click on the port field. The [ENTER] Connect button should light up.
Click [ENTER] Connect to continue.
Can’t connect? If you can’t connect, check to make sure the IP address you wrote down earlier is correct and that your Raspberry Pi is connected to the same Wi-Fi access point your computer is.
Note If you rewrite or replace your SD card, you will need to remove and add the Secure Shell Extension from Chrome. You can do this by right clicking on the icon in your toolbar and selecting Remove, then re-add it by following the instructions above.
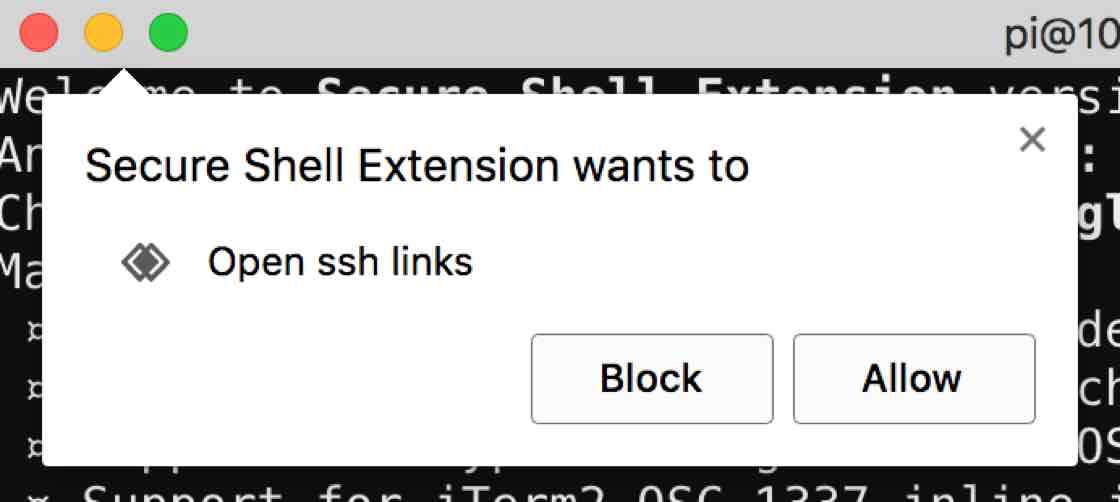
Give the extension permission
Click Allow.
This gives permission to the SSH extension to access remote computers like your Raspberry Pi.
You will only need to do this when you add the extension into Chrome.

Continue connecting
At this point, the SSH extension has connected to your Raspberry Pi and is asking you to verify that the host key it printed out matches what is stored on the Raspberry Pi. Since this is the first time your Raspberry Pi has been turned on, the data listed above this prompt is brand new, and it's safe to continue.
When you answer yes here, the SSH extension will save this information to your browser and verify it is correct every time you reconnect to your Raspberry Pi.
At the prompt, type yes and press enter to continue.
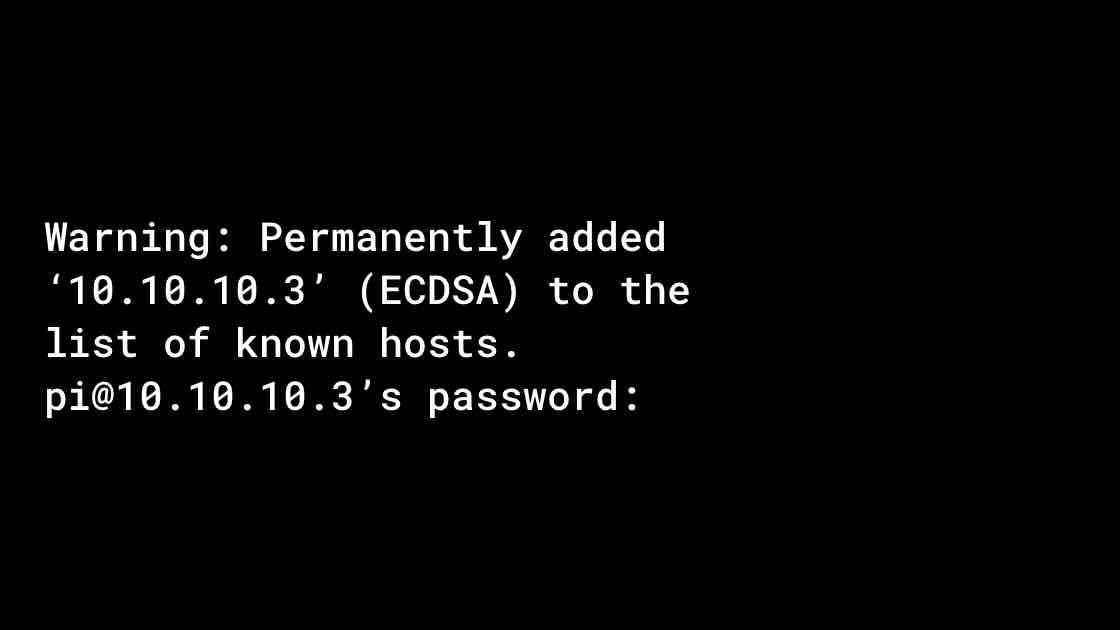
Enter the Raspberry Pi’s password
Enter Raspberry Pi’s password at the prompt. The default, case-sensitive password is raspberry
When you type, you won’t see the characters.
If it’s typed wrong, you’ll see “Permission denied, please try again” or “connection closed.” You’ll need to re-start your connection by selecting the (R) option by pressing the R key.
Note Your IP address will be different than the one shown in the example.
It’s okay if you see the warning line. It’s letting you know that the host key has been saved, and the extension will do the hard work of comparing what it just stored with what the Raspberry Pi provides automatically next time.

Confirm you’re connected
If the password was entered correctly, you’ll see a message about SSH being enabled by default and the pi@raspberrypi shell prompt will be green.
Congrats! Your computer is now connected to the Raspberry Pi.
Tip: Copying and pasting in the Secure Shell Extension is a little different than other applications you may be used to. To copy some text, highlight what you want by clicking and dragging with the left mouse button, and as soon as you let go of it, it'll copy it. To paste, click the right mouse button. On a touchpad this can be a little tricky, so try tapping or pressing in the lower right of the touchpad, or tapping with two fingers.
Verify audio works

Adjust the volume
By default, the sound is usually quite loud, so let's turn it down before playing anything. Type the following command into your prompt and press enter:
alsamixer
Press the down key several times to lower the volume. We suggest going all the way down to about "40" but you can adjust again after you try the speaker. Then press the Esc key to exit the program.
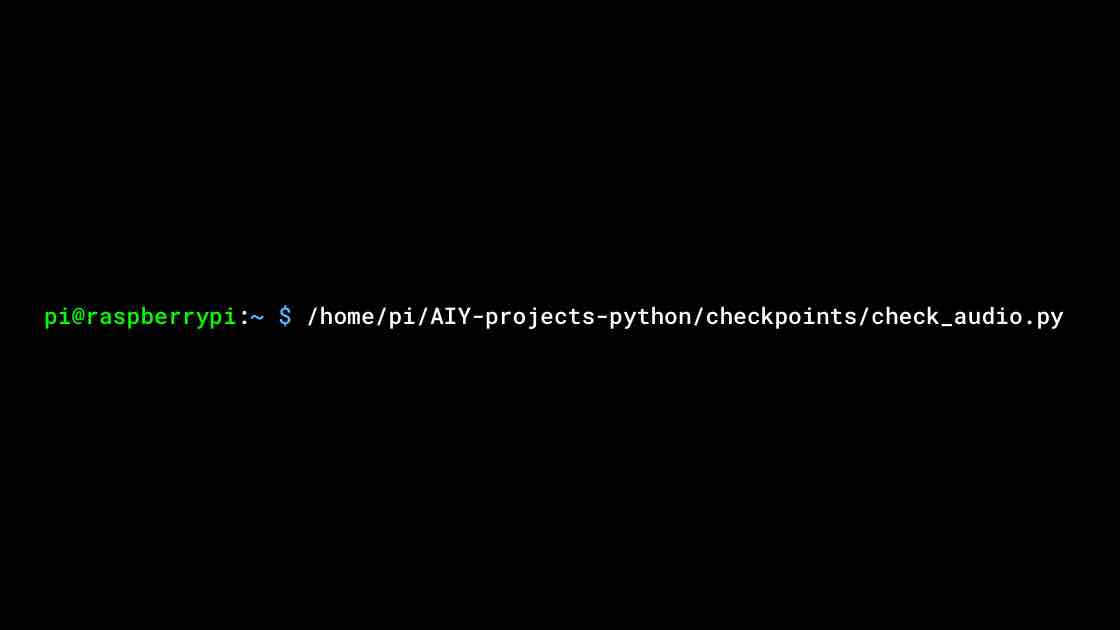
Launch audio test script
Now run the following command line to verify the speaker (and microphone) works:
/home/pi/AIY-projects-python/checkpoints/check_audio.py
You should then hear a voice say, "Front, center" (which is the speaker position).
Follow along with the prompts. The next one asks you to speak to the kit so it can test the microphone. When done, if everything is working correctly, you’ll see a message that says AIY sound card seems to be working!
If you see an error message, follow the message details to resolve the issue and try again.
Get Credentials
Log into the Google Cloud Platform
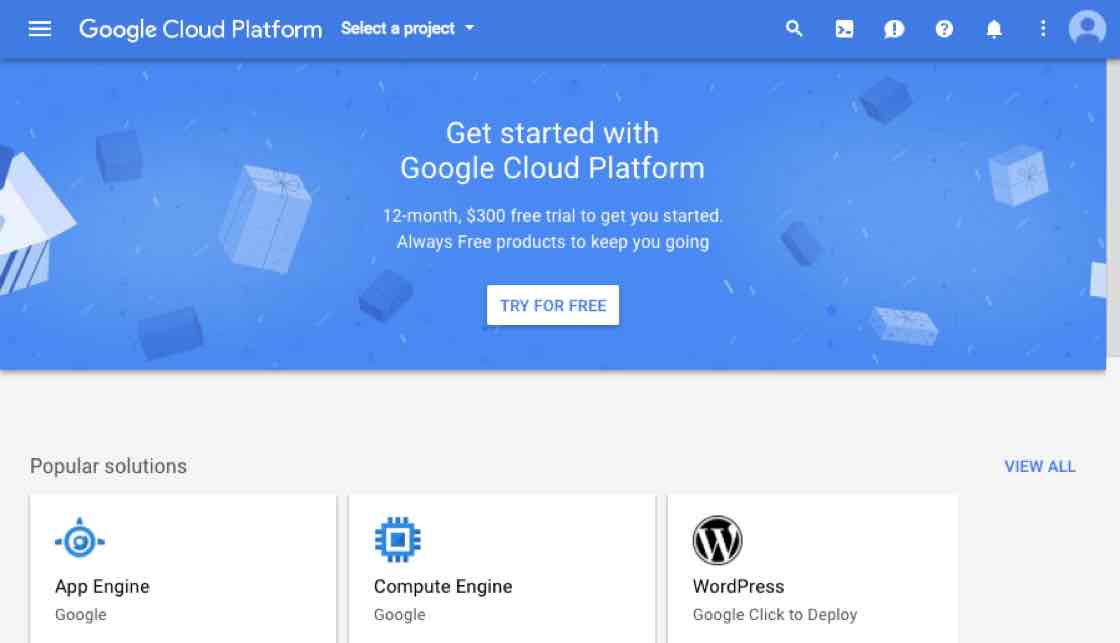
In order to make use of the Google Assistant APIs, you need to get credentials from Google's developer console.
On your computer (not the Raspberry Pi), go to https://console.cloud.google.com/ and log in with your Google account.
If it's your first time, you'll need to agree to the terms of service.
Don’t have a Google account? Sign up for one here.
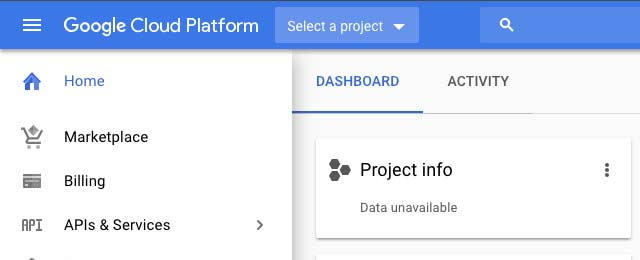
Select a project
First, we have to create a project to track all of the APIs we want to use on the Voice Kit.
From the top bar, click Select a project.
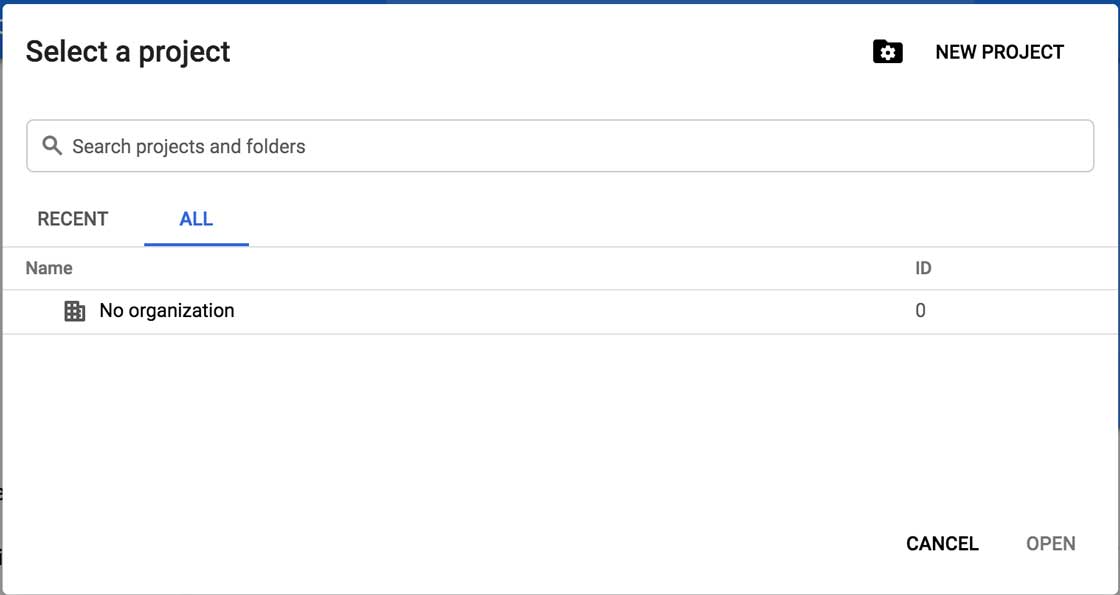
Create a new project
A dialog like the image to the left will appear.
Click New Project in the top right corner of the dialog.
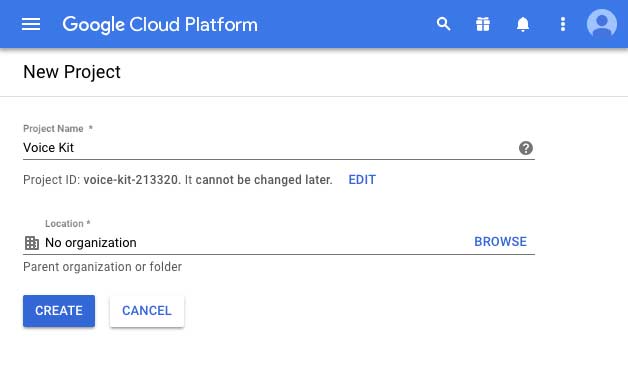
Enter a project name
Enter a project name and click Create. (You can leave the Location option alone.)
We’ve used "Voice Kit" for a project name, but you can enter any name you like.
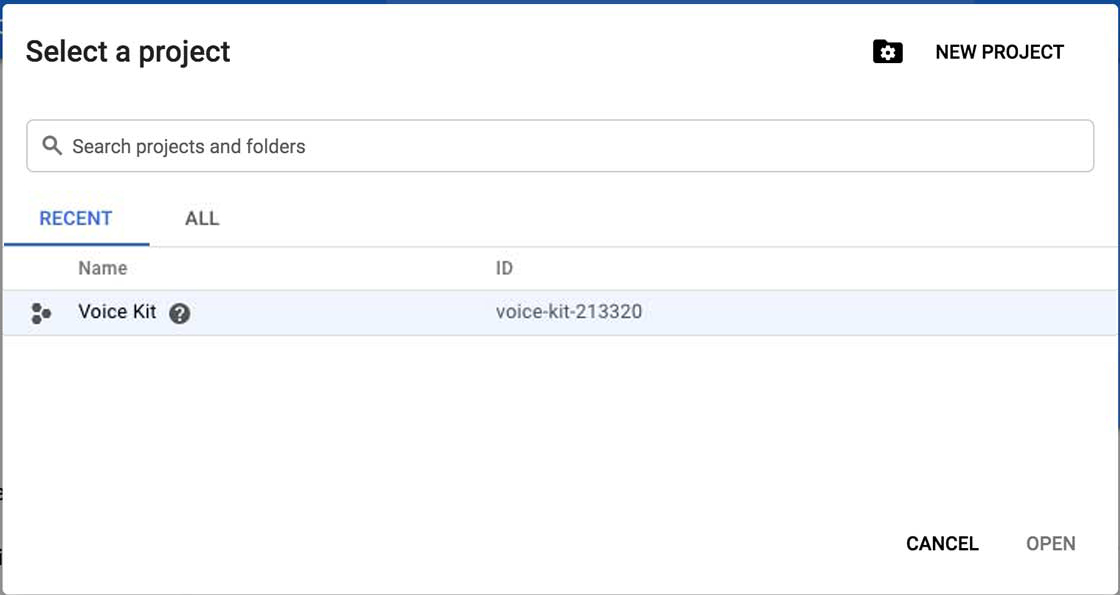
Open the project
Now that we've created the project, we need to select it so we can turn on the APIs we want to use.
Click the Home link in the left navigation. Then click Select a project at the top of the screen again. Then select the project you just created.
This opens the dashboard view for your project (you can tell by the dropdown at the top of the screen; it should display the name you chose in the previous step).
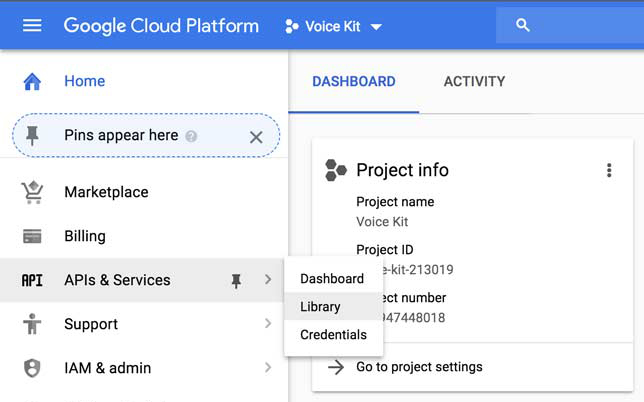
Navigate to the library
If the left navigation is not already visible, click on the three-line menu icon at the top left of the page to open it. Hover your mouse over APIs & Services, and then click Library.
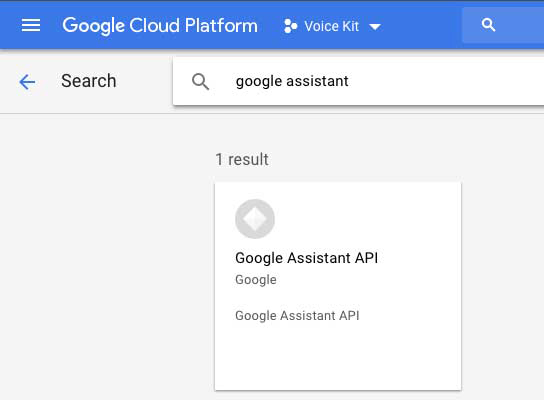
Turn on the Google Assistant API
In the search box, type "google assistant" and click on the card labeled Google Assistant API.
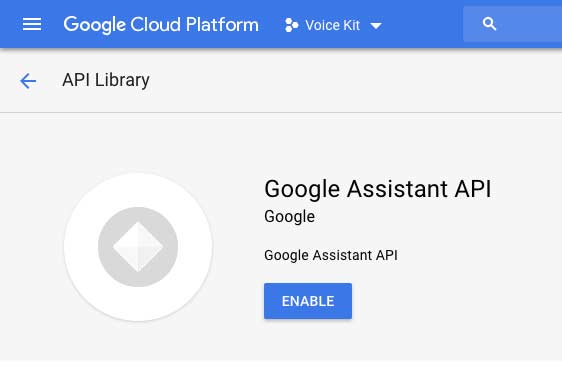
Enable the Google Assistant API
Click Enable.
This turns on the Google Assistant API for your project, and gives applications you write access to its features.

Create credentials
You'll be directed to a Dashboard page for the Google Assistant API. From here you can get more details on how you're using the API and see how many requests you're making.
Right now, we just need to create a credentials file so the Voice Kit demos can tell Google who they are, and which project they're a part of.
Click the Create credentials button.
Tip: If you later need to restart this process, the UI will be a little different: Make sure you're viewing the API & Services > Credentials section in the left nav, and at the top of the screen, click Create credentials > Help me choose. That will open the following credentials helper.
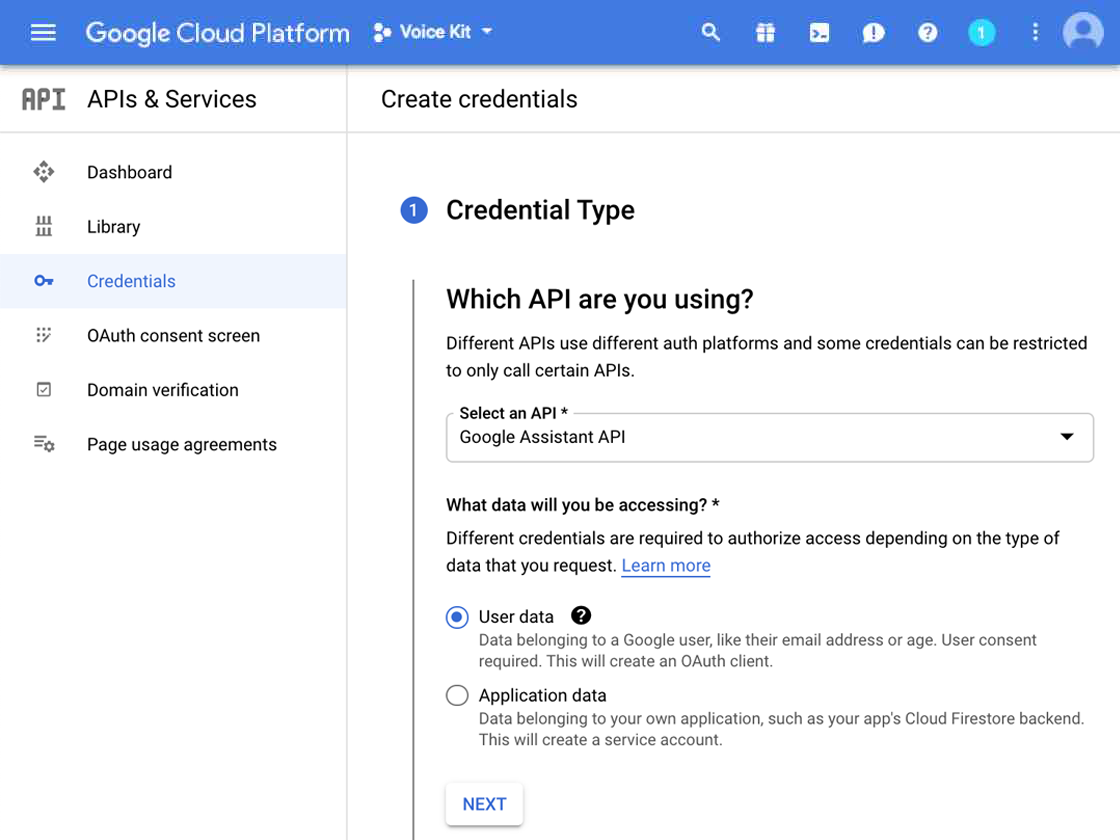
Add credentials to your project
You should be directed to the Credentials helper page.
For "Which API are you using?", select Google Assistant API.
For "What data will you be accessing?", select User data.
Then click Next.
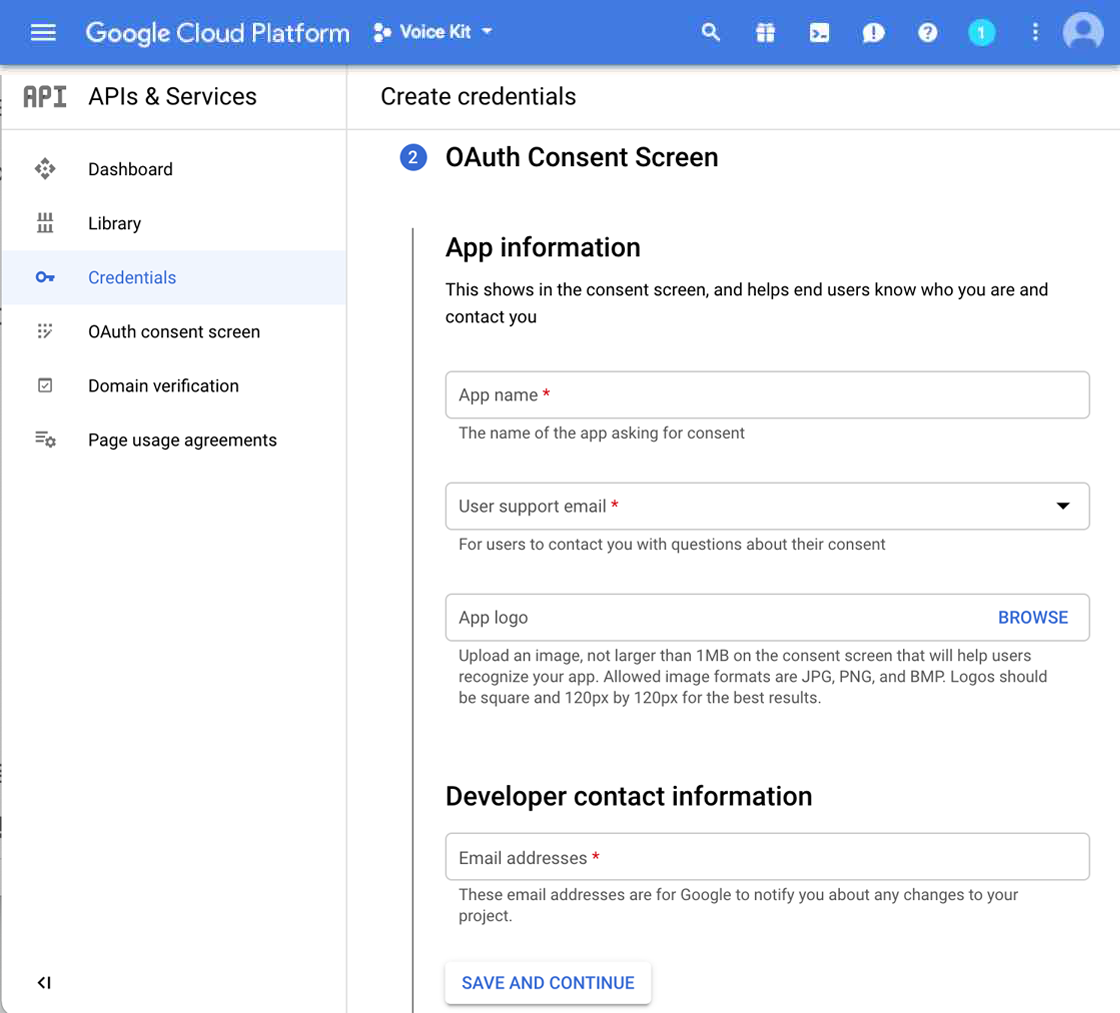
Fill out the consent screen
Because the app requires user data, you need to add information for a user consent screen.
The information in the consent screen is intended for end-users when publishing a production product that uses Google APIs. But because this project is just for your personal use, you can keep it simple.
Enter something for the App name, such as "Voice Kit Project."
For the User support email, select your account email from the drop-down.
You can leave the App logo empty, and type your email for the Developer contact information.
Then click Save and continue.
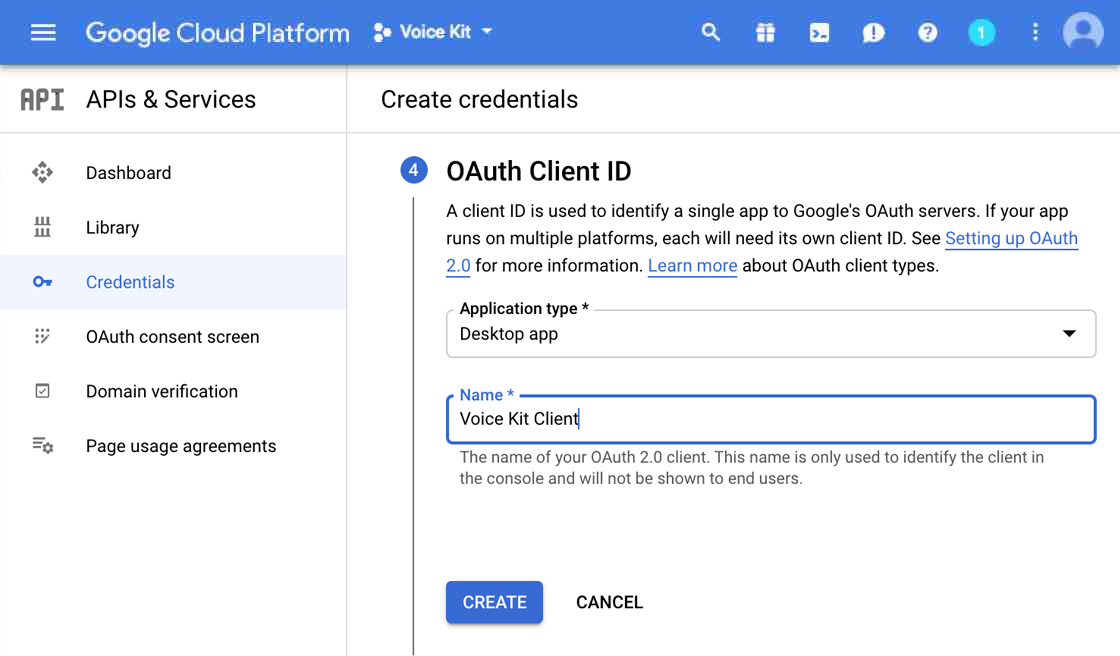
Create OAuth client ID
Skip the Scopes section by scrolling down and clicking Save and continue.
Next, you'll see the OAuth Client ID section. For the Application type, select Desktop app, and enter a name for the client, such as "Voice Kit Client."
Then click Create.
Finally, you have the Google Assistant client credentials! You'll need to add these credentials to the Vision Kit. But before you do that, we need to do one more thing in the Cloud Console...
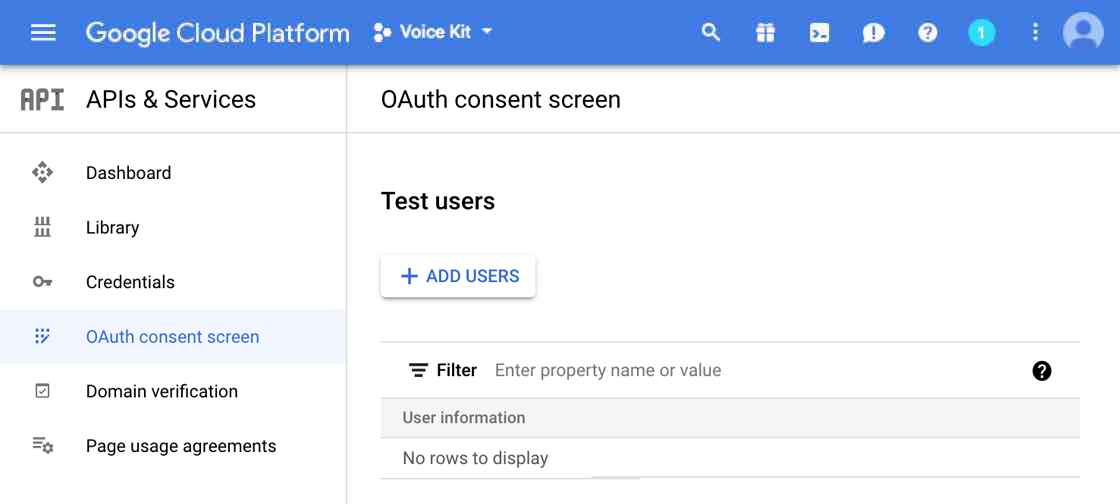
Add yourself as a test user
In the left navigation, click OAuth consent screen.
Scroll down to Test users and click Add users.
In the form that appears, enter your Google Account email address (it must be the account that you'll use when signing in from the Voice Kit), and click Save.
You should then see your email address listed under Test users (below the button).

Download the credentials
Now go get the client credentials by clicking Credentials in the left nav.
Find your client name under OAuth 2.0 Client IDs and click the download button  on the far right. A dialog appears where you must then click Download JSON to get the credentials in a .json file.
In the following steps, you'll copy this to your Raspberry Pi and save it at ~/assistant.json.
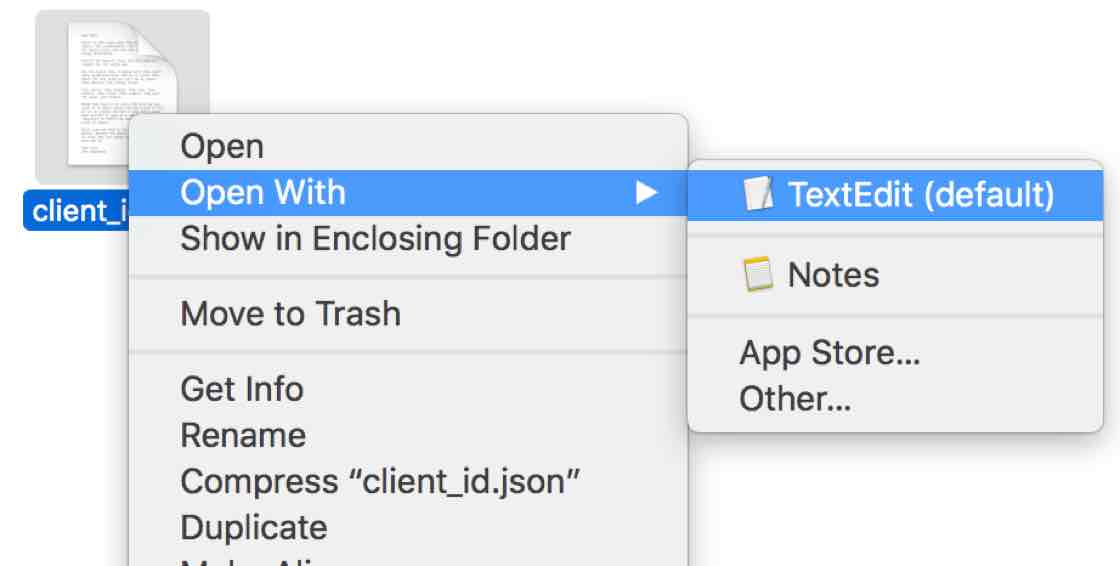
Open the .json file
Open your Downloads folder and find the .json file (it has a very long name starting with client_secret_).
For Mac: Right-click the file and select Open With > TextEdit.
For Windows: Right-click the file and select Open With > More applications > Notepad.
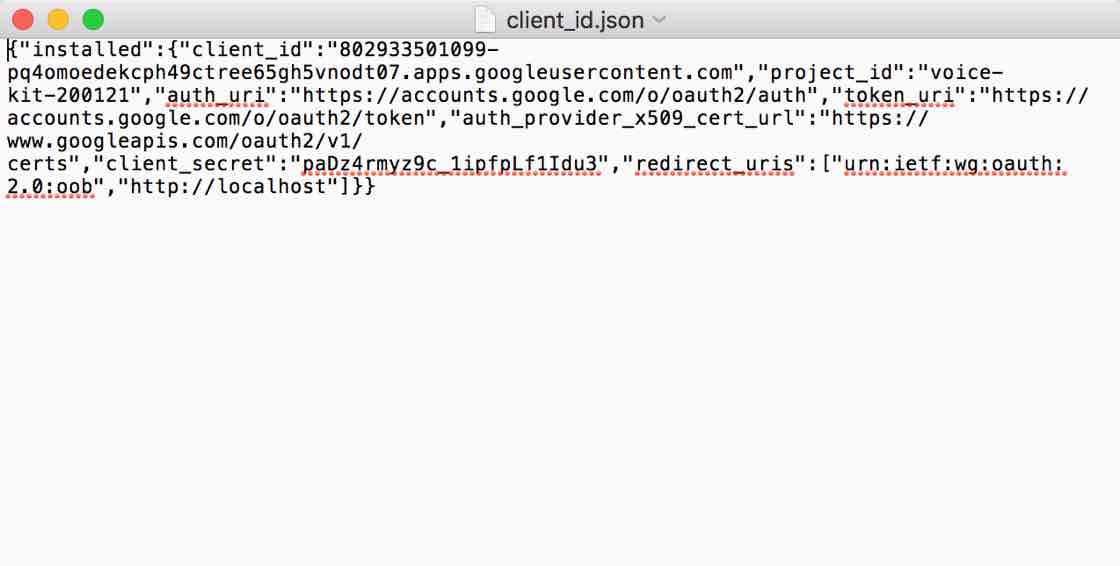
Copy the text
We’re going to copy the text from the text file so that we can paste it into a new file on your Raspberry Pi.
From Notepad or TextEdit, select Edit > Select All, then Edit > Copy.
Go back to Secure Shell Extension
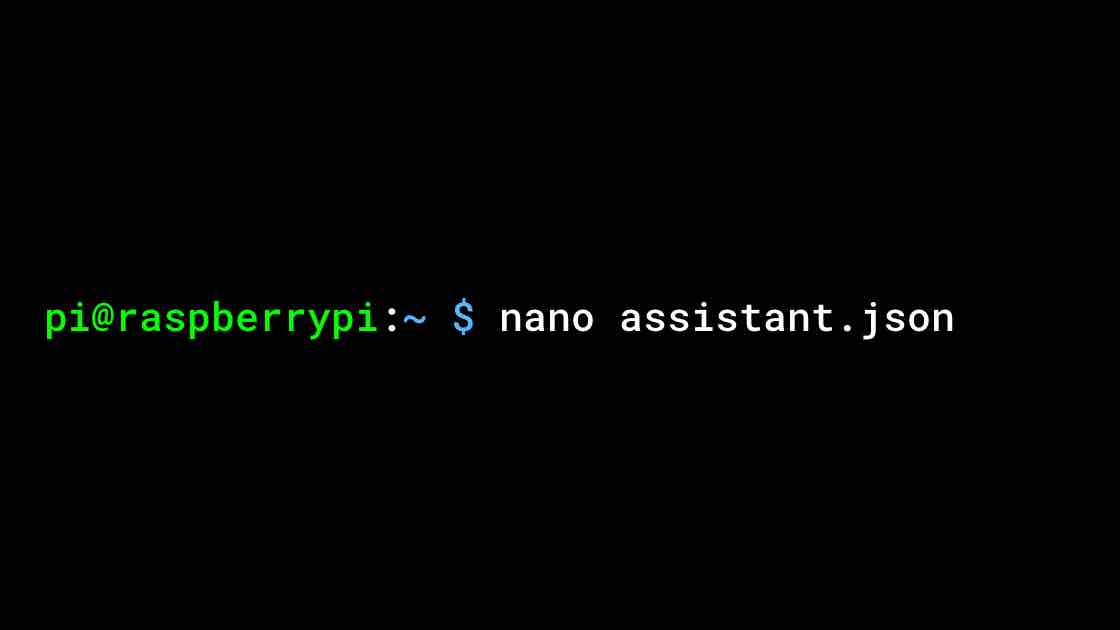
Back in Secure Shell Extension, type the following command and press enter:
nano assistant.json
This command starts the nano text editor so we can paste the contents of the JSON file we downloaded earlier into a file on disk.
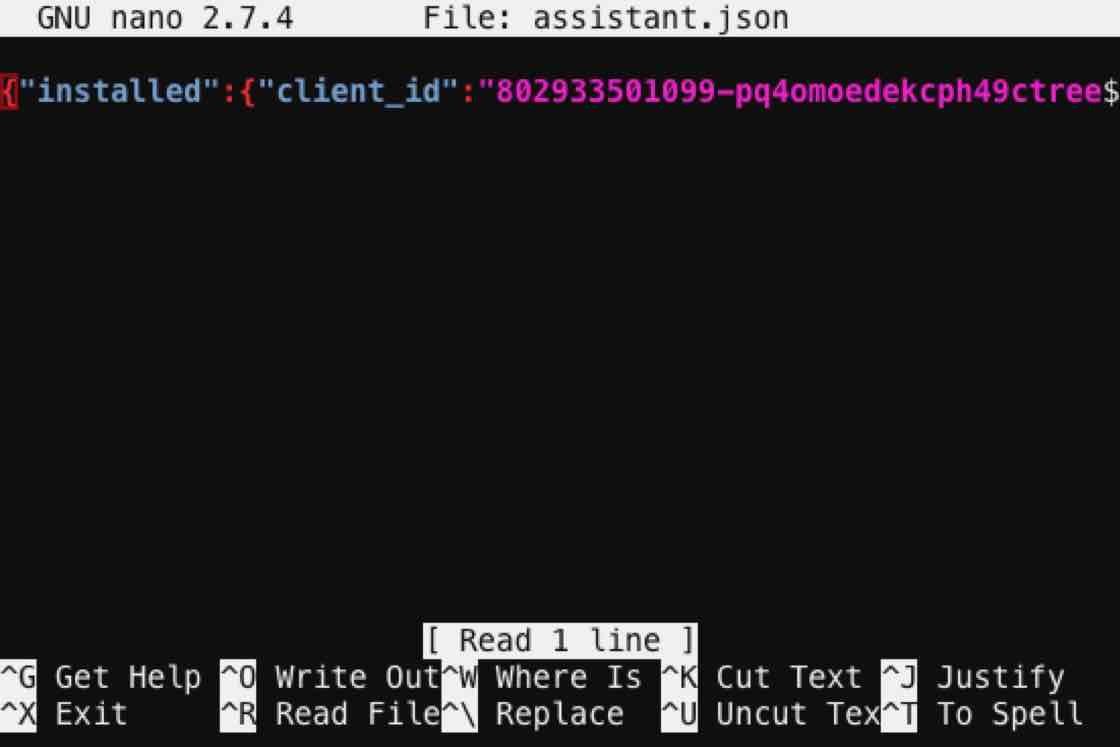
Paste the text
Right-click to paste the text.
Note: Your client id will look different.

Write it to a file
To save the file, press Ctrl-O (that’s O as in Open, not the number zero).
A prompt appears to verify the file name you already specified: assistant.json. Press Enter.
Hint: nano has quite a few options you can use to write programs with later. Press Ctrl-G to find out more.

Exit
Press Ctrl-X to exit. This will bring you back to the shell prompt.
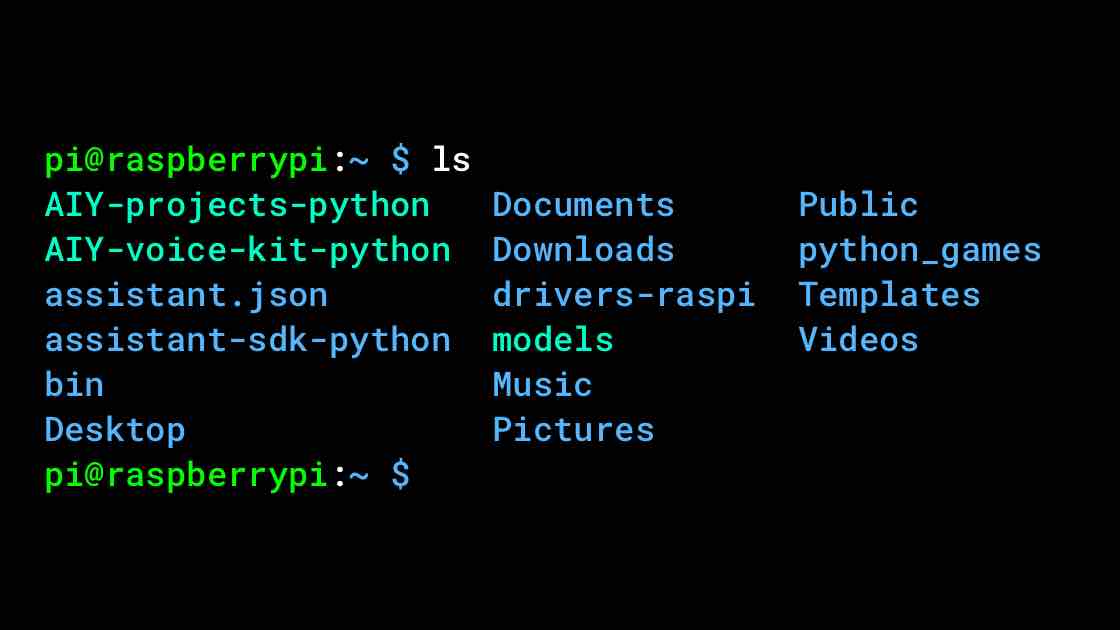
Confirm the file was created
Type ls and press enter (that’s an “l” as in lemon, not a #1).
This shows you all of the files in your current directory. You should see assistant.json here.
To see the file contents, run cat assistant.json.
Congrats! Now you have the API credentials you need for the Voice Kit demos (the demos know to look here for the assistant.json file).
Run the Assistant Demo

Move to the demos folder
Now we’re going to try out some demos. Let’s change directories to the folders where the demos live.
Type the following command line and press enter:
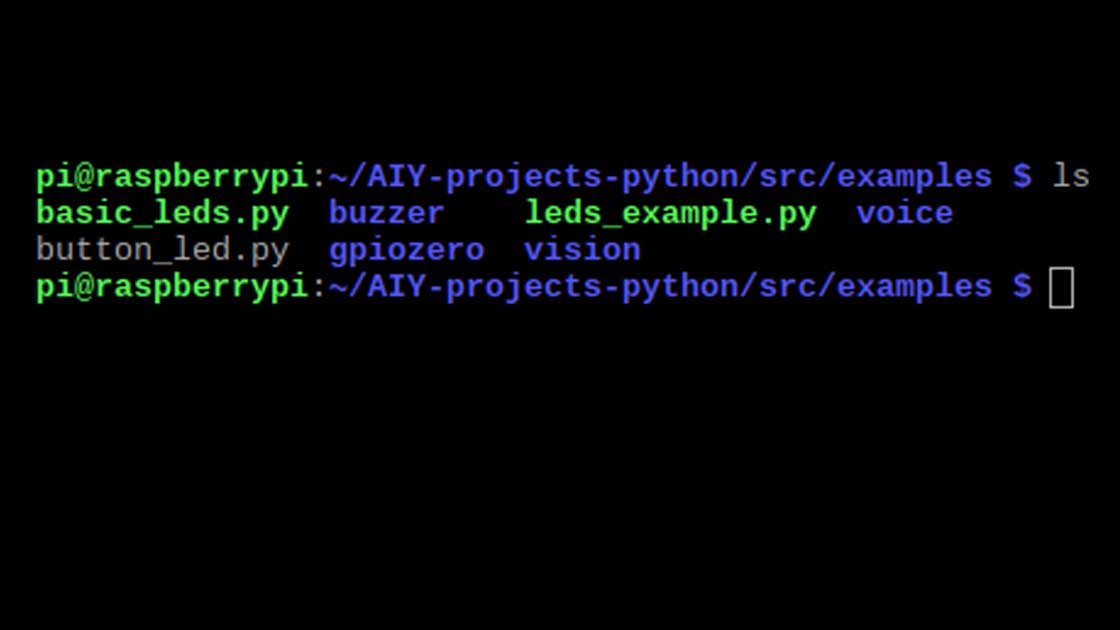
cd ~/AIY-projects-python/src/examples
What’s cd? cd stands for change directory. Think of it as clicking through file folders. You should see the path in the command line in blue. Capitalization matters: it’s cd, not CD. Practice using cd and ls to navigate around!
What’s python? Python is a programming language that we use for the majority of our demos and scripts. It's a simple language and is very easy to learn. You can find out more about Python at https://www.python.org/.
Take a look around
Now that you've changed directories, type ls and press enter to see what's inside the examples directory.
Most of what you'll try in the following steps is in the voice/ directory.
Learn more about working in the terminal: Check out some guides from our friends at the Raspberry Pi Foundation: Conquer the Command Line and Linux Commands.
Run the assistant demo
Now we’re going to run the assistant demo and try out those APIs we turned on earlier.
Type the following command line and press enter:
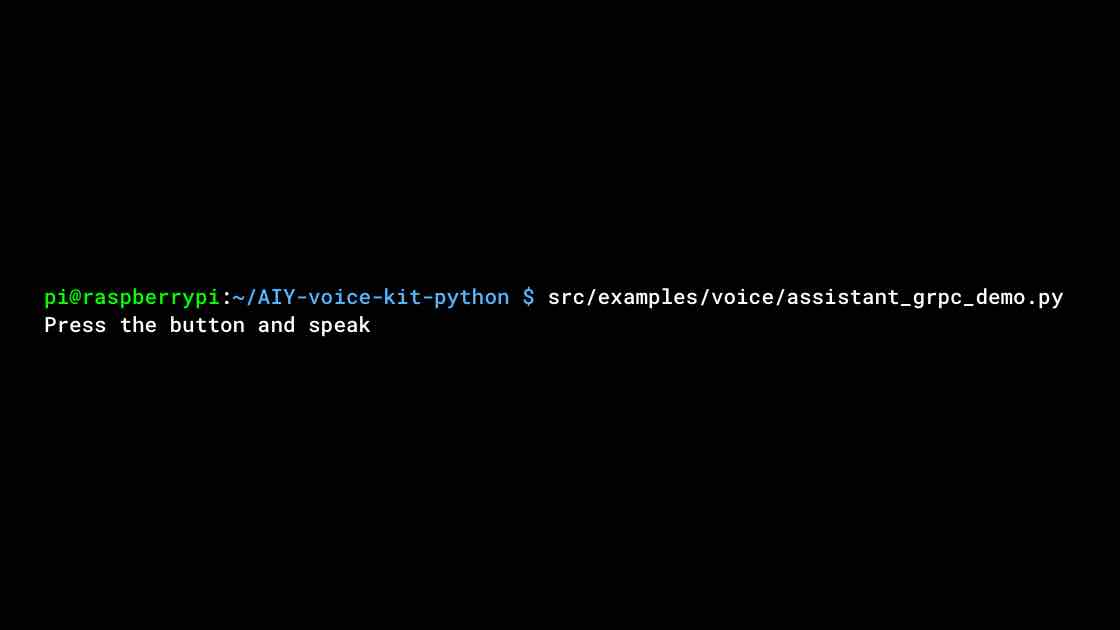
voice/assistant_grpc_demo.py

Authorize the app
You’ll see a message asking you to visit a URL to authorize the application. Because this application makes use of the Google Assistant, it needs your permission to safely access your Google account's data.
Copy and paste the link into the web browser on your desktop (not on the Raspberry Pi).

Sign into your Google account
The web page should show either a Choose your account or Sign in screen. Be sure you sign in using the same account that you entered as a test user for the OAuth consent screen above.
It will then warn you that "Google hasn’t verified this app." This is expected, so click Continue on the left.
Then it will say the project "wants access to your Google Account." Click Continue again.
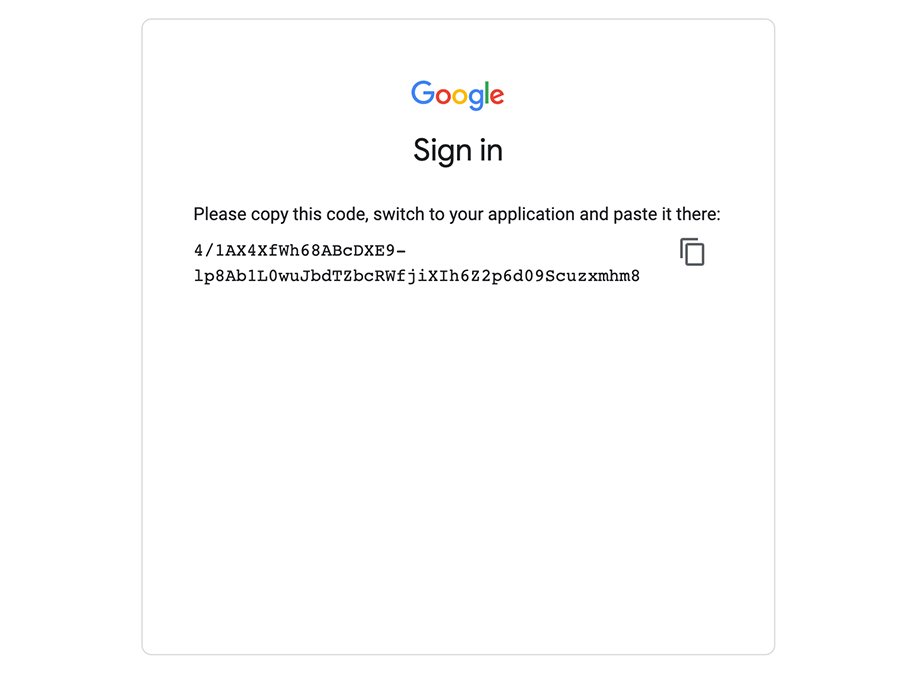
Finish authorization
Now the web page will display your authorization code.
Copy the code, paste it into you Raspberry Pi terminal (the prompt should still show "Enter the authorization code"), and press Enter.
See the demo running
After entering the auth code, you should see the terminal on the Raspbery Pi immediately begin printing more messages (these are for debugging and you can ignore them).
If all is well, you will soon see "Press button to start conversation..."
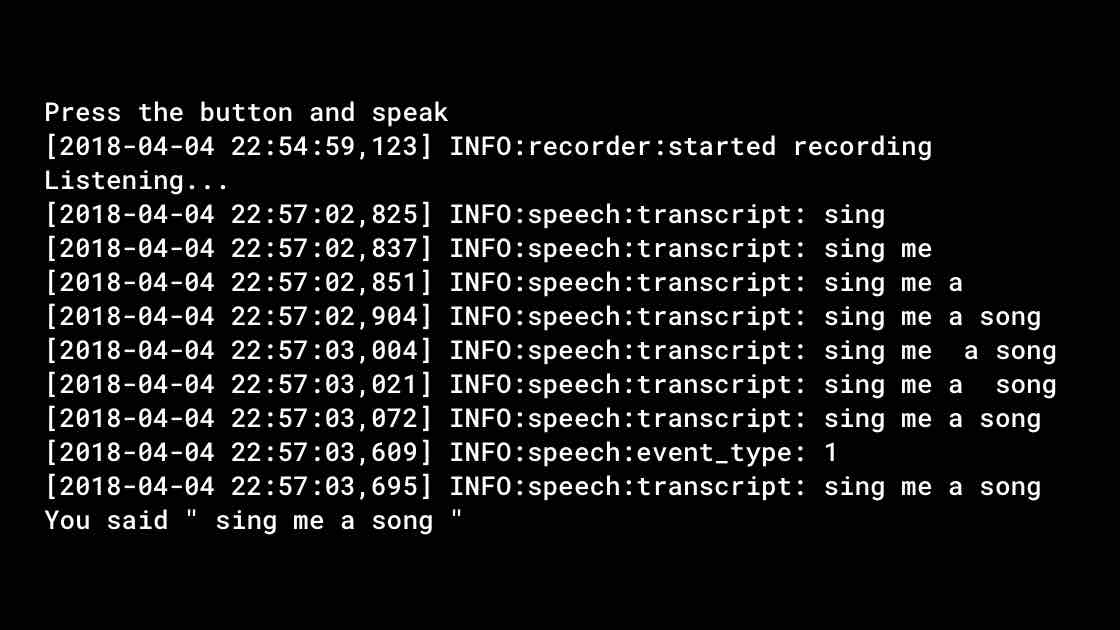
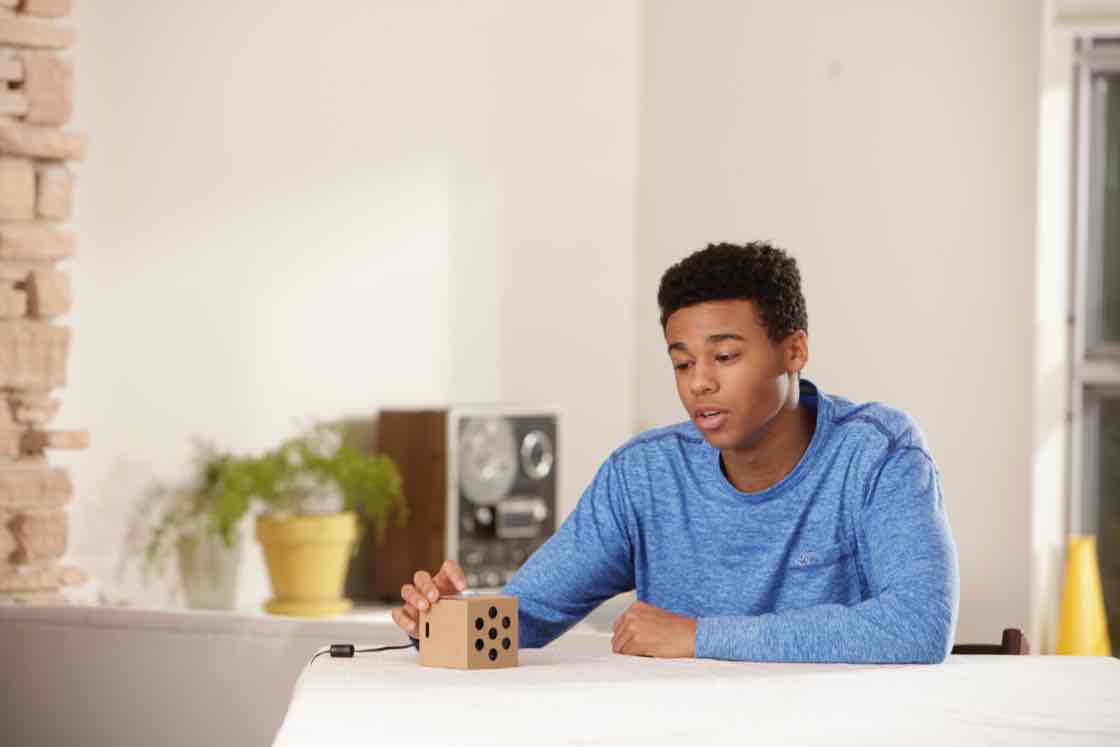
See machine learning at work
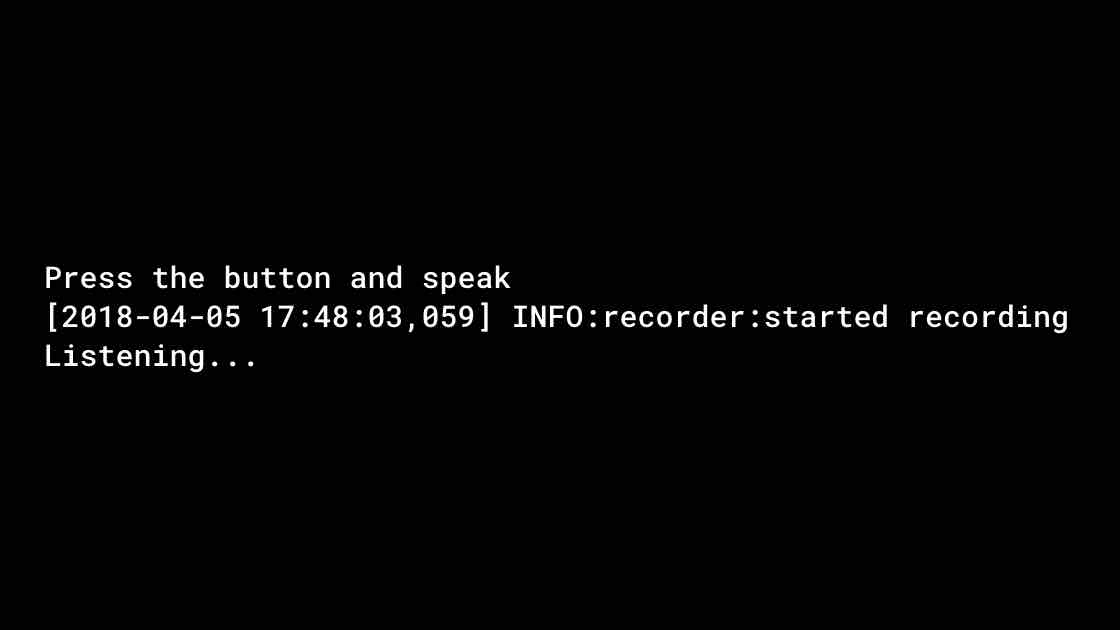
Tap and release the button on the Voice Kit. The button color should change from light red to dark red to indicate it's listening.
Ask a question or give the Google Assistant a command. For example, ask "what's the weather today," or say, “sing me a song.”
As you speak, you’ll see what the machine learning model is "hearing" as it prints log message in the terminal.
Note: It might take a few seconds for the Google Assistant to respond (it’s gotta think). If the Voice Kit is having trouble hearing you, make sure you’re not too close to the device. Try speaking from a little further back.
Experiment with the Google Assistant
Here are our favorite things to say to the Google Assistant:
“Beam me up Scotty!”
“How much wood could a woodchuck chuck...”
“I’m one of your engineers.”
“How do you say "this tastes delicious" in Korean?”
“How far away is the moon?”
“Beatbox!”
“Remind me to call my friend tomorrow morning.”
Finish testing the demo
When you’re done testing the demo, press the button and say “Goodbye” or press Ctrl-C to interrupt it and stop the demo.
If it freezes, press Ctrl-C, and then the ‘up’ arrow for the src line to wake it up again.

Close the demo
When you’re done with your Voice Kit for the day, it’s important to shut it down properly to make sure you don’t corrupt the SD card.
Type the following command and press enter:
sudo poweroff
Once you see the prompt to (R)econnect, (C)hoose another connection, or E(x)it? and the green LED on the Raspberry Pi has turned off, you can unplug the power supply from your kit safely. Remember when you reconnect your power supply to wait until the LED stops blinking before reconnecting your kit via SSH.
Important: The demo will stop working if you close the Secure Shell Extension or unplug your kit.
Feedback
How did setting up and running the Google Assistant demo go?
Reconnecting your Kit
To reconnect to your kit, plug it back into the power supply and wait for it to boot up (about 4 minutes).
Then go ahead and reconnect via SSH.
Note: You may have to re-pair your kit via the app.
What's Next?
Congrats! You’ve set up your very own intelligent speaker.
Now that you’ve got a taste for the Voice Kit can do, we’d love to see what you do with it. In the following Makers Guide section, you'll find documentation about the Python APIs, hardware, and tools that help you to build your own intelligent speaker projects.
Share your creations with the maker community at #aiyprojects
Heads up! The next part assumes a much higher level of technical experience. So if you're new to programming, don't be discouraged if this is where you stop for now.
Maker's guide
Python API library
To support various features in the Voice Kit, we've built a Python library that handles a lot of programming dirty work for you. It makes it easy to interact with services like Google Assistant and Cloud Speech-to-Text, and to use kit peripherals such as the button, LEDs, and extra GPIO pins.
These APIs are built into a Python package named aiy, which is pre-installed in the kit's system image. Just be sure that you've installed the latest system image.
To learn more about these APIs, refer to the API reference. In particular, the following APIs will be of interest for use with your Voice Kit:
aiy.assistant: APIs that simplify interaction with the Google Assistant API.aiy.cloudspeech: APIs that simplify interaction with the Google Cloud Speech-to-Text service.aiy.voice.audio: APIs to record and play audio files.aiy.voice.tts: An API that performs text-to-speech (reads some text aloud).aiy.board: APIs to use the button that’s attached to the Voice Bonnet’s button connector.aiy.leds: APIs to control the LEDs in the button.aiy.pins: Pin definitions for the bonnet's extra GPIO pins, for use with gpiozero.
Examples
You might find it easier learn the aiy Python API if you start with an existing demo and modify it to do what you want.
These files are already installed on your kit at ~/AIY-projects-python/src/examples/. You can also browse the examples on GitHub, where you'll find the source code for all the examples and more.
For instance, to learn more about the aiy.voice.audio API, try running the voice_recorder.py example:
cd ~/AIY-projects-python/src/examples/voice

python voice_recorder.py
This waits for you to push the button, then begins recording what you say. When done speaking, press the button again and it will play the recording.
To see how it works, open this file on your Raspberry Pi or see the source code here. Then start tweaking the code.
If you're more interested in programming hardware such as buttons and servos, see the section below about the GPIO expansion pins, which includes some other example code.
Custom Voice User Interface
Want to try another API? Follow the instructions below to try the Google Cloud Speech-to-Text service, which converts spoken commands into text you can use to trigger actions in your code. This API supports 80 languages, long audio clips, and the ability to add hint phrases that help improve the accuracy of speech recognition.
Change to the Cloud Speech API
To get started, you'll use the src/examples/voice/cloudspeech_demo.py example code.
Turn on billing
The Google Cloud Speech-to-Text service is a cloud-based service. If you use it for less than 60 minutes a month, it’s free. Beyond that, the cost is $0.006 for every 15 seconds. Don’t worry: you’ll get a reminder if you go over your free limit.
- In the Cloud Console, open the navigation menu

- Click Billing
- If you don’t have a billing account, then click New billing account and go through the setup
- Return to the main billing page, then click the My projects tab.
- Find the name of your new project. Make sure it’s connected to a billing account.
- To connect or change the billing account, click the three-dot button
 , then select Change billing account
Enable the API
- In the console, open the navigation menu and click APIs & Services
- Click ENABLE API
- Enter “Cloud Speech API” into the search bar, then click the name
- Click ENABLE to turn on the API
Create a service account and credentials
- Go to the left-hand navigation menu, click APIs & Services and then click Credentials
- Click Create credentials and then click Service account key from the list
- From the “Service account” dropdown, click New service account
- Enter a name so that you’ll know this is for your voice recognizer stuff, like “Voice credentials”
- Select the Project viewer role
- Use the JSON key type
- Click Create
- Your credentials will download automatically. The file name contains your project name and some numbers: locate it rename it to
cloud_speech.json - Open your workstation’s terminal. Move your
credentials.jsonfile to the correct folder by entering the following:
(using the local file system)
`cp /path/to/downloaded/credentials.json ~/cloud_speech.json`
(from another machine)
`scp /path/to/downloaded/credentials.json pi@raspberrypi.local:~/cloud_speech.json`
On your desktop, double-click the Check Cloud icon. Wait a few moments while the script runs. If everything is working correctly, you’ll see this message:
Eveything is set up to use the Google Cloud
If you see an error message, follow the details and try the Check Cloud script again.
Start the demo app
On your desktop, double-click the Start Dev Terminal icon. Then start the app by running the following commands:
cd ~/AIY-projects-python/src/examples/voice

./cloudspeech_demo.py
Voice commands
Once the program starts, it prints some log messages, including INFO:aiy.cloudspeech:Start listening which means it's ready to receive a voice command. So now you can speak one of the following commands (speak loudly and clearly toward the Voice Kit).
| Voice command | Response |
|---|---|
| turn on the light | The button LED turns on |
| turn off the light | The button LED turns off |
| blink the light | The button LED blinks |
| goodbye | The app exits |
Create a new voice command (or action)
Now you can add your own voice actions by modifying cloudspeech_demo.py as follows.
Example: repeat after me
Let's add the ability for the program to repeat what you say. That is, if you say something like, "repeat after me, hello world," then it will say "hello world."
To improve the recognition accuracy for your voice command, first make it explicit what command you expect to hear by adding it to the list returned by the get_hints() function:
def get_hints(language_code):
    if language_code.startswith('en_'):
        return ('turn on the light',
                'turn off the light',
                'blink the light',
                'goodbye',
                'repeat after me')
    return None
Then add the code to handle the command. We will use aiy.voice.say to repeat the recognized transcript. So add a new condition in the if-else code at the bottom of the main() function as shown here:
            if 'turn on the light' in text:
                board.led.state = Led.ON
            elif 'turn off the light' in text:
                board.led.state = Led.OFF
            elif 'blink the light' in text:
                board.led.state = Led.BLINK
            # Our new command:
            if 'repeat after me' in text:
                # Remove "repeat after me" from the text to be repeated
                to_repeat = text.replace('repeat after me', '', 1)
                aiy.voice.tts.say(to_repeat)
            elif 'goodbye' in text:
                break
But the code doesn't know about this say() function yet. So you need to go back to the top of the file and add the following import statement alongside the others:
import aiy.voice.tts
Now save the file.
The complete modified cloudspeech_demo.py should look like this:
"""A demo of the Google CloudSpeech recognizer."""
import argparse
import locale
import logging

from aiy.board import Board, Led
from aiy.cloudspeech import CloudSpeechClient
import aiy.voice.tts


def get_hints(language_code):
    if language_code.startswith('en_'):
        return ('turn on the light',
                'turn off the light',
                'blink the light',
                'goodbye',
                'repeat after me')
    return None

def locale_language():
    language, _ = locale.getdefaultlocale()
    return language

def main():
    logging.basicConfig(level=logging.DEBUG)

    parser = argparse.ArgumentParser(description='Assistant service example.')
    parser.add_argument('--language', default=locale_language())
    args = parser.parse_args()

    logging.info('Initializing for language %s...', args.language)
    hints = get_hints(args.language)
    client = CloudSpeechClient()
    with Board() as board:
        while True:
            if hints:
                logging.info('Say something, e.g. %s.' % ', '.join(hints))
            else:
                logging.info('Say something.')
            text = client.recognize(language_code=args.language,
                                    hint_phrases=hints)
            if text is None:
                logging.info('You said nothing.')
                continue

            logging.info('You said: "%s"' % text)
            text = text.lower()
            if 'turn on the light' in text:
                board.led.state = Led.ON
            elif 'turn off the light' in text:
                board.led.state = Led.OFF
            elif 'blink the light' in text:
                board.led.state = Led.BLINK
            # Our new command:
            if 'repeat after me' in text:
                # Remove "repeat after me" from the text to be repeated
                to_repeat = text.replace('repeat after me', '', 1)
                aiy.voice.tts.say(to_repeat)
            elif 'goodbye' in text:
                break

if __name__ == '__main__':
    main()
Return to your terminal window and run the code again. Wait until the terminal prints INFO:aiy.cloudspeech:Start listening and then try saying "repeat after me, hello world." The result should be that the speaker says "hello world."
GPIO Header Pinout
If you plan to take your project beyond the cardboard box, you might be wondering which GPIO pins are available for your other hardware. So figure 1 shows exactly which pins from the Raspberry Pi are used by the Voice Bonnet.

Figure 1. GPIO pins used by the Voice Bonnet (highlighted pins are used)
GPIO Expansion Pins
The Voice Bonnet also includes a dedicated microcontroller (MCU) that enables the following additional features:
- Control of four additional GPIO pins, freeing up the Pi GPIOs for other uses
- PWM support for servo/motor control without taxing the Raspberry Pi's CPU
- Analog input support via on-board analog-to-digital converter (ADC)
- Control of the two LEDs on the bonnet
The extra GPIO pins are provided on the top of the Voice Bonnet (see figure 2). You can control the GPIOs and LEDs with the gpiozero library, using pin names PIN_A, PIN_B, PIN_C, PIN_D, LED_1, and LED_2.
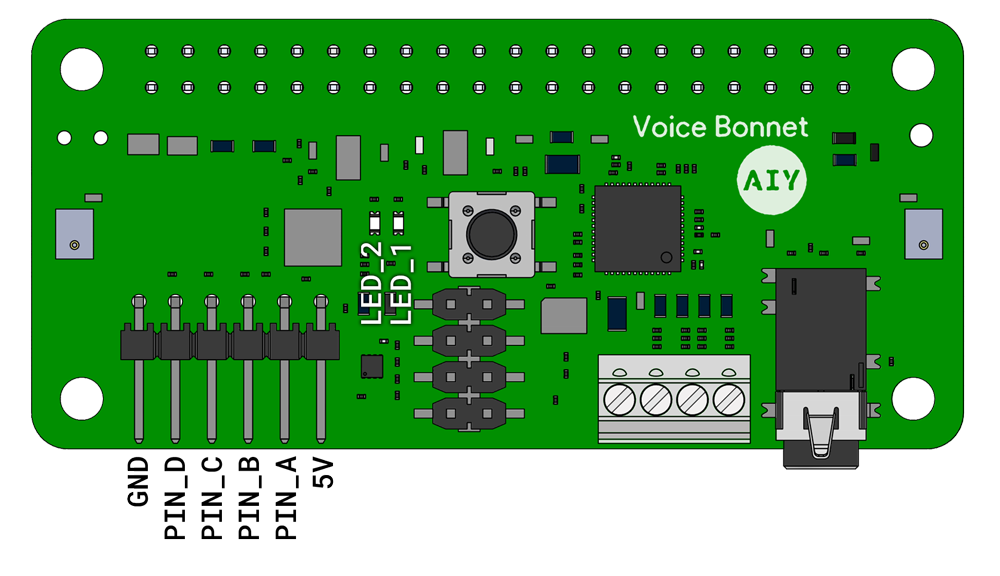
Figure 2. GPIO expansion pins on the Voice Bonnet
The gpiozero-compatible pin definitions are provided by the aiy.pins package. You can use these definitions to construct standard gpiozero devices like LEDs, Servos, and Buttons.
WARNING: Before you connect any wires to the Voice Bonnet, be sure your Raspberry Pi is disconnected from any power source. Failure to do so could result in electric shock, serious injury, death, fire or damage to your board or connected components and equipment.
LED example
Note: The following example code might not be installed on your SD card right out of the box. Be sure that you are running the latest system image.
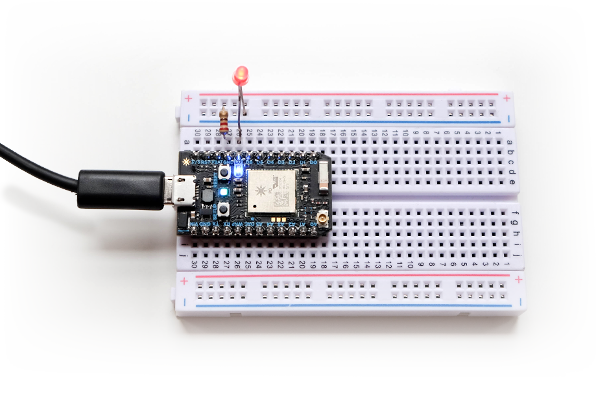
Although the LEDs on the bonnet are easy to use, you probably want your light to appear somewhere else. So connect an LED to PIN_A and GND as shown in figure 3. (Be sure the long/bent leg of the LED is connected to PIN_A; the resistor can be any size over 50 ohms.)
Then run the led_chaser.py example code:
cd ~/AIY-projects-python/src/examples/gpiozero

./led_chaser.py
It takes several seconds for the script to begin. Once it does, your light will blink on and off. To stop, press Control+C.
If the light does not blink, continue to wait another 15 seconds. If it still does not blink, look for any errors in the terminal window. Then press Control+C to stop the script, power off the kit, and double check all wiring. Then try again.
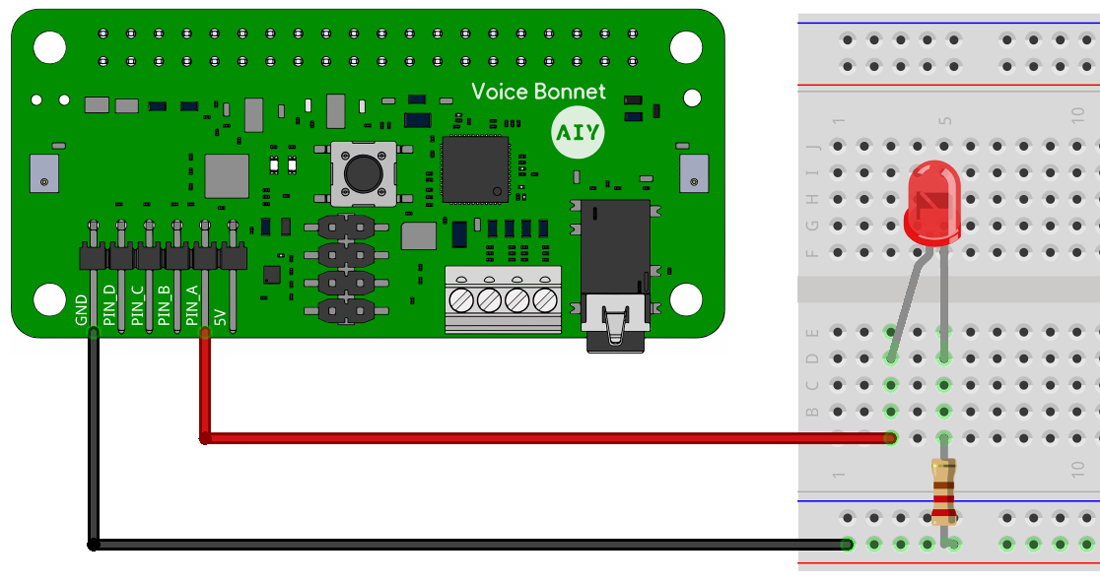
Figure 3. An LED connected to the Voice Bonnet
The led_chaser.py script is designed to light up 4 LEDs in sequence, as shown here:
from time import sleep
from gpiozero import LED
from aiy.pins import (PIN_A, PIN_B, PIN_C, PIN_D)

leds = (LED(PIN_A), LED(PIN_B), LED(PIN_C), LED(PIN_D))
while True:
    for led in leds:
        led.on()
        sleep(0.5)
        led.off()
Of course, the code works fine with just one LED connected. But once you have the one LED working, try connecting LEDs to PIN_B, PIN_C, and PIN_D in the same way, and run the code again.
Servo example
Because the GPIO pins on the Voice Bonnet are controlled by an on-board MCU, they perform pulse-width modulation (PWM) more precisely than the Raspberry Pi. So these pins are great for controlling servos.
To try it out, connect a servo to the GND, PIN_B, and 5V pins as shown in figure 4, and then run the servo_example.py script:
cd ~/AIY-projects-python/src/examples/gpiozero

./servo_example.py
It takes several seconds for the script to begin. Once it does, your servo should rotate back and forth between the minimum, maximum, and neutral position. But each servo can be a little different, so you might need to tune the parameters of the code to achieve a perfect alignment with your servo's full range of motion.
If the terminal prints an error that ends with gpiozero.exc.GPIOPinInUse: Pin already in use, then type sudo !! and press Enter (this is a shortcut to repeat the last command with sudo).
If the servo does not respond, continue to wait another 15 seconds. If it still does nothing, look for any errors in the terminal window. Then press Control+C to stop the script, power off the kit, and double check all wiring. Then try again.

Figure 4. A servo connected to the Voice Bonnet
The servo_example.py script uses the gpiozero Servo object to control the servo. The important parts of the script look like this:
from gpiozero import Servo
from aiy.pins import PIN_B

# Create a servo with the custom values to give the full dynamic range.
tuned_servo = Servo(PIN_B, min_pulse_width=.0005, max_pulse_width=.0019)

# Move the Servos back and forth until the user terminates the example.
while True:
    tuned_servo.max()
    sleep(1)
    tuned_servo.mid()
    sleep(1)
    tuned_servo.min()
    sleep(1)
To adjust the rotation range of your servo, open the Python script and adjust the parameters of the Servo() constructor. Also see the Servo API documentation.
For more examples using the GPIO pins, see the AIY GitHub examples.
All of these example files are already available on your Voice Kit in the direcory ~/AIY-projects-python/src/examples/. Just be sure you have the latest system image on your SD card.
Button Connector Pinout
If you want to modify the button interface (such as to change the actual button), be sure to follow the wiring pinout as shown in figure 5.
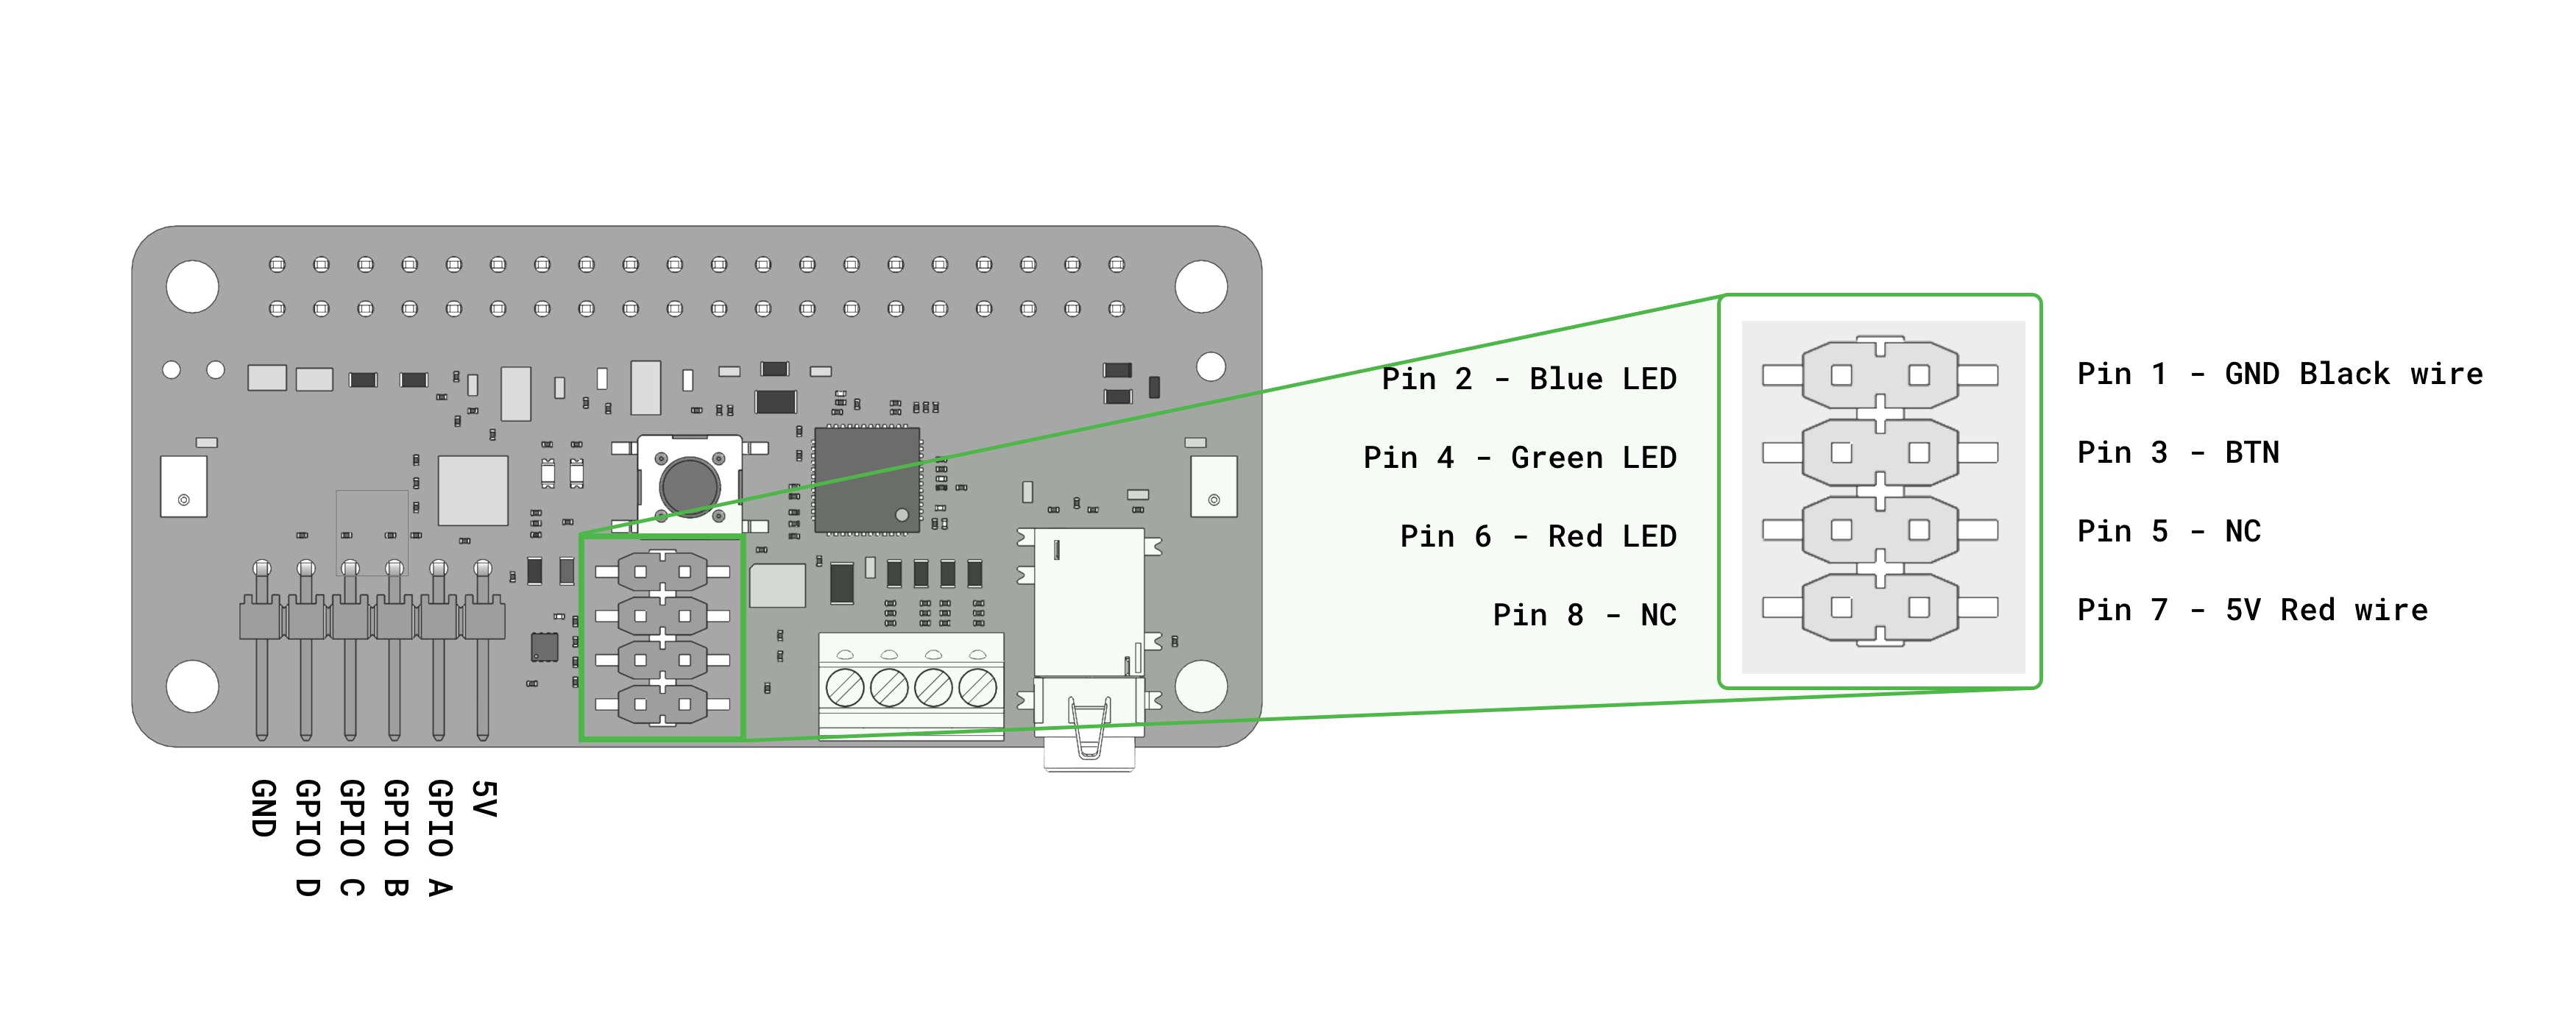
Figure 5. Pinout for the bonnet button connector
Google Actions + Particle Photon (via Dialogflow)
Want to learn how to use your Voice Kit to control other IoT devices? You can start here with a Particle Photon (a Wi-Fi development kit for IoT projects) and Dialogflow (a tool for creating conversational interfaces). This tutorial will show how to make your Voice Kit communicate with Dialogflow (and Actions on Google) to control an LED light with the Photon by voice.
Get all the code for this example here.
What's included
This example ties together multiple technology platforms, so there are a few separate components included in this repo:
dialogflow-agent- an agent for Dialogflowdialogflow-webhook- a web app to parse and react to the Dialogflow agent's webhookparticle-photon- a Photon app to handle web requests, and to turn the light on and off
We've included two separate web app implementations. Choose (and build on) the one that best suits your preferences:
1-firebase-functions- a microservices-oriented implementation, built for deployment to Cloud Functions for Firebase — a serverless, on-demand platform2-app-engine- a server-based implementation, designed to run on Google App Engine (or your server of choice)
This should be enough to get you started and on to building great things!
What you'll need
We’ll build our web app with Node.js, and will rely on some libraries to make life easier:
On the hardware side, you will need:
- Your AIY Voice Kit running the Google Assistant demo (or another device running Google Assistant)
- a Particle Photon (or a similar web-connected microcontroller, like the Redbear Duo)
It's handy to have a breadboard, some hookup wire, and a bright LED, and the examples will show those in action. However, the Photon has an addressable LED built in, so you can use just the Photon itself to test all the code presented here if you prefer.
You'll also need accounts with:
- Dialogflow (for understanding user voice queries)
- Google Cloud (for hosting the webhook webapp/service)
- Particle Cloud (for deploying your Photon code and communicating with the Particle API)
If you're just starting out, or if you're already comfortable with a microservices approach, you can use the 1-firebase-functions example — it's easy to configure and requires no other infrastructure setup. If you'd prefer to run it on a full server environment, or if you plan to build out a larger application from this, use the 2-app-engine example (which can also run on any other server of your choosing).
If you've got all those (or similar services/devices) good to go, then we're ready to start!
Getting started
Assuming you have all the required devices and accounts as noted above, the first thing you'll want to do is to set up apps on the corresponding services so you can get your devices talking to each other.
Local setup
First, you'll need to clone this repo, and cd into the newly-created directory.
git clone git@github.com:google/voice-iot-maker-demo.git
cd git@github.com:google/voice-iot-maker-demo.git
You should see three directories (alongside some additional files):
dialogflow-agent- the contents of the action to deploy on Dialogflowdialogflow-webhook- a web application to parse the Google Actions/Dialogflow webhook (with server-based and cloud function options)particle-photon- sample code to flash onto the Particle Photon
Once you‘ve taken a look, we’ll move on!
Dialogflow
Using the Dialogflow account referenced above, you‘ll want to create a Dialogflow agent. We'll be setting up a webhook to handle our triggers and send web requests to the Particle API.
- Create a new agent (or click here to begin). You can name it whatever you like
- Select Create a new Google project as well
- In the Settings section (click on the gear icon next to your project name) and go to Export and Import
- Select Import from zip and upload the zip provided (
./dialogflow-agent/voice-iot-maker-demo.zip)
You've now imported the basic app shell — take a look at the new ledControl intent (viewable from the Intents tab). You can have a look there now if you're curious, or continue on to fill out the app's details.
- Head over to the Integrations tab, and click Google Assistant.
- Scroll down to the bottom, and click Update Draft
- Go back to the General tab (in Settings), and scroll down to the Google Project details.
- Click on the Google Cloud link and check out the project that's been created for you. Feel free to customize this however you like.
- Click on the Actions on Google link, and go to 2 - App information
- Click Add, and fill in the details of your project there
- Add some sample invocations, as well as a pronunciation of your Assistant app's name
- Fill out the other required fields (description, picture, contact email, etc.)
- Scroll down to the bottom, and click Test Draft
You can now test out the conversational side of the app in one of two ways:
- Talk to the Google Actions simulator: https://developers.google.com/actions/tools/simulator
- Test queries (by the GUI or cURL) via the try it now interface in the Dialogflow GUI
You can also try talking to your application on any Assistant-enabled device that you‘re signed into.
However, if you’re following along step-by-step, it won't turn any lights on yet — we still have to set up the web service and the Photon app. Onward then!
Google Cloud
Depending on which hosting environment you want to use, cd into either ./dialogflow-webhook/1-firebase-functions or ./dialogflow-webhook/2-app-engine, and continue the setup instructions in that directory's README.md file.
IMPORTANT: Regardless of what hosting/deployment method you choose, make sure you return to the Dialogflow panel and go into the Fulfillment tab to update the URL field. Also, check that the DOMAINS field is set to "Enable webhook for all domains". Without doing these things, Dialogflow won't be able to talk to your new webhook.
Particle
Make sure the Photon is correctly set up and connected. (If it’s not configured yet, follow the steps in the Particle docs
You can upload your code to your photon via the Particle web editor, the Particle Desktop IDE (based on Atom), or the Particle command-line tools.
We'll be using the CLI for this example, which you can install thusly:
sudo npm i particle-cli -g
To deploy via the command line, first make sure you’re logged in:
particle login
You can find out the ID of your device by running:
particle list
Then upload the code using that ID:
particle flash [YOUR-DEVICE-ID] particle-photon/particle-blink-demo.ino
The Photon should blink rapidly while the upload is in process, and when it's done (and calmly pulsing cyan), you're ready to go.
Note: Make sure you generate a Particle access token, and add that token (along with your Photon's device id) to your config.js file.
You can make sure it all works by running the following from your terminal:
curl https://api.particle.io/v1/devices/[YOUR-DEVICE-ID]/led -d access_token=[YOUR-ACCESS-TOKEN] -d led=on
If everything is configured properly, you should see something like the following:
{
    "id": "[YOUR-DEVICE-ID]",
    "last_app": "",
    "connected": true,
    "return_value": 1
}
You should see the Photon's light come on (along with an LED on the breadboard, if you've wired one up)! Doing the same with led=off will return a 0 instead of a 1, and will (you guessed it) turn the light off.
Note: If you ever see a "return_value":-1, that's an error message — something has gone wrong somewhere.
Putting it all together
Once you’ve uploaded all the code and each service is configured, it’s time to give it all a try! You can confirm that everything went to plan by going to either your Assistant-enabled device or the Google Actions simulator, asking to talk to your app ("talk to [APP-NAME]"), and typing "turn the light on". If all goes well, your LED should turn on!
Further reading
This application is just a taste of what's possible — how far you take this framework is up to you! Here are a few resources to help you continue on your journey:
Run your app at bootup
By default, your Voice Kit doesn't do anything when it boots up; you must manually execute a program such as the Assistant Demo. But you can make this program (or any other program of your choice) run automatically upon bootup by creating a systemd service.
All you need is a .service configuration file. This file accepts a long list of configuration options, so we've provided an example for you that starts the Assistant Demo on bootup. You can find the file at ~/AIY-projects-python/src/examples/voice/assistant_grpc_demo.service and it looks like this:
[Unit]
Description=Assistant gRPC Demo
Wants=network-online.target
After=network-online.target
Wants=systemd-timesyncd.service
After=systemd-timesyncd.service

[Service]
Environment=DISPLAY=:0
Type=simple
Restart=always
User=pi
ExecStart=/usr/bin/python3 -u /home/pi/AIY-projects-python/src/examples/voice/assistant_grpc_demo.py --language en-US

[Install]
WantedBy=multi-user.target
To put this file into action, you need to put it into the /lib/systemd/system/ directory. But instead of actually moving this file there, you can create a symbolic link (a "symlink") in this directory that points to the file that already exists. You can do this as follows:
# Move to the directory with the .service file
cd ~/AIY-projects-python/src/examples/voice/

# Create the symlink
sudo ln -s `pwd`/assistant_grpc_demo.service /lib/systemd/system

# Reload the service files so the system knows about this new one
sudo systemctl daemon-reload
Now tell the system to run this service on bootup:
sudo systemctl enable assistant_grpc_demo.service
All set! You can try rebooting now to see it work.
Or manually run it with this command:
sudo service assistant_grpc_demo start
Note: Even after the prompt returns from this command, it takes a few moments for the program to start. When the Assistant Demo is ready, the button lights up.
If you want to stop the service from running on bootup, disable it with this command:
sudo systemctl disable assistant_grpc_demo.service
And to manually stop it once it's running, use this command:
sudo service assistant_grpc_demo stop
You can check the status of your service with this command:
sudo service assistant_grpc_demo status
Now to create a similar service for your own program, just copy the configuration from above to a new file such as my_program.service (the name must end with .service). Then (for most programs) all you need to do is change ExecStart so it points to your program's Python file (and passes it any necessary parameters), and change Description to describe your program. Then follow the steps above using your service name instead.
If you'd like to better understand the service configuration file, see the .service config manual.
View Log Data
If you need to see more logs to help with debugging (or you're simply curious to see more output), you can view system logs and program-specific logs using the journalctl tool.
By default, this prints a lot of system information that won't be useful to you, so it's best if you launch your program as a service and then tell journalctl to print only the logs from that service.
For example, if you start the Assistant Demo as a service, you can begin printing all log output for that service with this command:
sudo journalctl -u assistant_grpc_demo -f
The -f option continuously prints new log entries as they occur. To stop printing the log, press Control+C.
More information
System updates
To get the latest bug fixes and features, update the system image for your kit as follows:
- Download the latest
.img.xzfile from our releases page on GitHub. - Use an adapter to connect your microSD card to your computer.
- Download, install, and launch the Raspberry Pi Imager.
- Click Choose OS, scroll to the bottom, select Use custom, and find the
.img.xzfile you downloaded above. - Click Choose storage to select your microSD card and then click Write to begin flashing the SD card.
When flashing is done, put the microSD card back in your kit and you're good to go!
Support
If you're having trouble assembling your kit or running the demos, try the following resources:
Project complete!
You did it! Whether this was your first hackable project or you’re a seasoned maker, we hope this project has sparked new ideas for you. Keep tinkering, there’s more to come.


कोई टिप्पणी नहीं:
एक टिप्पणी भेजें
टिप्पणी करें